
ヒントとコツ
一般的に、純粋なプラズマパワーはコンタクトやリモート治療よりも有益な効果をより早く生み出すことが認められています。しかし、これら2つのパワーを高める方法はいくつかあり、設定タブでできることの例をいくつかご紹介します。
Holland 11th ハーモニクス(リモート/コンタクト)
アンソニー・ホランド博士は、任意の周波数の11倍音を同時に適用すると、その効果が向上することを実証しました。これには2つの方法があります。1つ目は周波数加算です。

- Hzフィールドに11を入力してください。
- 左のボックスにチェックを入れ、メニューから「F1からF2を追加」を選択します。Spooky2は、新しい加算波を波形表示に表示します。
しかし、Spooky2は、高調波を可変キャリアとして使用するように設定することもできます。これは世界初の機能です。キャリアはボディの浸透を助け、強力なパンチも提供します。

- 先ほどと同様に、Hz フィールドに 11 を入力します。
- 左のボックスにチェックを入れ、メニューから「F1を使用してF2を変調(AM DSB)」を選択します。Spooky2は、波形表示に新しい変調波を表示します。
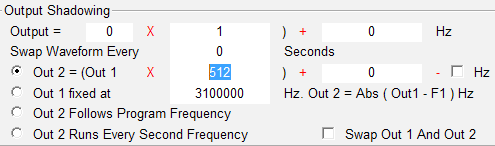
周波数をミックスすることもできます。これは、アウトプット・シャドウイングと呼ばれるプロセスでアウトプット2を使用します。これを使用するには、まず「Follow Out 1」を選択し、以下の設定を行います。

- ここで、Out 1 Hz の値に 11 の係数を乗じ、Spookyブーストを適用して、送信します。
これは、出力のラジオ帯域周波数をアウトプット1のオーディオ帯域周波数から直接生成するため、シャドウイングと呼ばれています。この方法の利点は、より細かいチューニングができることで、これについては後ほど詳しく説明します。これらの両方の方法も、深い浸透のためのダイナミックキャリアの作成に使用されます。これらのシェルプリセットは、Miscellaneous(その他)に用意されています。
スクーン効果(プラズマ)
オーブリー・スクーンは、英国におけるライフ療法のパイオニアの一人でした。おそらくは作り話と思われる話ですが、彼は同じ周波数であると信じていた2つの機械を使って実験を行っていた際、その効果は大幅に増幅されていることに気づきました。しかし、そのうちの1つの機械が、実際にはもう一方の機械よりも1Hz高い周波数を送信していたことを発見し、驚愕したということです。
そのサークルの一員であった人の中には、そのようなことはなかったと主張し、それは会話上の誤解が定着したものだと主張する人が今でも生きています。

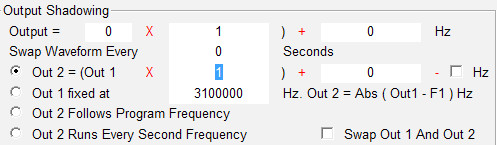
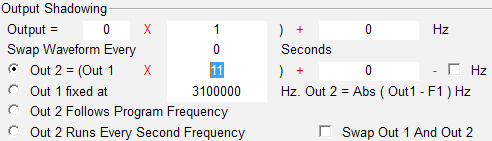
それでも、それを信奉し、常に使用している経験豊富な研究者はいます。Spooky2の両方の出力を使用する方法は次の通りです。
- 2行目の係数フィールドに1を入力すると、Out 1の周波数がOut 2にコピーされます。次に、定数フィールドに1を入力します。
シンプルそのものです。シェルプリセットはMiscellaneous(その他)に用意されています。

必要であれば、F2 = F1 パネルで追加の設定を行うことで、アウトプット 1 の信号にホーランド 11th ハーモニクスを適用して、パンチをさらに追加することができます。
- これで、11番目の高調波を組み込んだ波形のコピーが2つでき、そのうちの1つはもう一方よりも1Hz大きいものとなります。さらに、その電圧は制御可能です。この制御性がどのように利用できるかについては、少し後で説明します。
超高周波数を使用する(リモート/コンタクト)
Spooky2-XMは、Spooky2が生成する任意波形の最大周波数の上限が5MHzです。Spooky2は、Wave Cycle Multiplier技術により、このハードウェアの制限を大幅に超えることができます。以下は、電力の低下や波形の歪みを最小限に抑えながら、最大25MHzで送信する方法です。
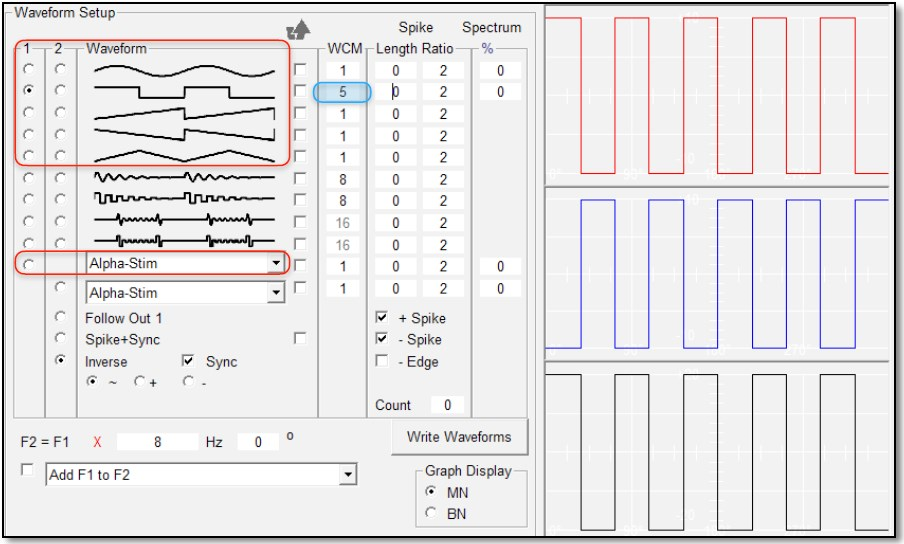
- 赤枠の上のボックスにある任意の波形をアウトプット1に使用できます。また、カスタムメニュー(赤枠の下)にある任意の波形も使用できます。アウトプット2の設定を行います。
- 次に、選択した波形の「Wave Cycle Multiplier WCM」フィールドに5を入力します(ここでは青くハイライトされた方形波)。
これは、Spooky2に1つの波サイクル内に5つのサブ波を作成するように指示します。Spooky2-XMのハードリミットは5MHzであるため、5という値はこれを上限の25MHzまで増加させます。
Spooky2は次に、ジェネレーターに波形をアップロードし、5MHzで動作するよう指示します。しかし、出力周波数は実際にはあなたが指定したものとなり、フルパワーで送信され、25MHzまでの完璧な波形で送信されます。
現在では25MHzまでの任意の周波数を送信できるため、病原体の実際のMOR(Mortal Oscillatory Rate)に近い、低周波数をより強力な周波数に変換することが望ましいでしょう。
プログラムタブをクリックし、Spooky2の周波数乗算機能を使用します。通常はデフォルト値の1に設定されていますが、任意の値を入力することができます。
しかし、送信するプログラムを検証し、使用する最適な乗数を決定する必要があります。最低周波数をMHz(百万ヘルツ)の範囲まで引き上げることを目指します。
実際にはこれより高い25 MHzまで上げることができますが、オーバードライブ周波数範囲の上限に近づくにつれ、周波数が高くなるにつれて出力が減衰し、波形が正確に形成されなくなることに注意してください。しかし、Spooky2を使用すれば、ジェネレーターXを使用して、ハードウェア設計の限界をはるかに超えた正確で強力な周波数を出力することができます。このテクニックはヒーリングには使用せず、殺傷のみに使用することに注意してください。
ダイナミックキャリアを使用する(コンタクト)
キャリア波は、周波数が体内に浸透しやすくなるようにします。ただし、リモートモードには必要ありません。しかし、使用することで信号がより効果的になります。
コンタクトモードでは、ダイナミックキャリアを使用する必要があります。これは、エンコードされた基本周波数を伝達するだけでなく、それ自体が強力な追加の「左フック」としても機能します。
低周波数を使用するヒーリングやデトックスプログラムでは、筋肉の収縮やヒリヒリする感覚が伴い、コンタクトモードのセッションを非常に不快なものにしてしまうことがあります。ダイナミックキャリアは、このような筋肉の収縮やヒリヒリする感覚を軽減します。
方形波でダイナミックキャリアを使用します。これにより、良好な変調信号が得られます。
電極を2人の被験者に使う(コンタクト)
Spooky2は、同じ条件を持つ2人の被験者が、2組のコンタクト電極を装着して周波数を受信することを可能にします。その方法は次の通りです。
波形など、必要な設定をすべて行います。次に、波形ペインの下部にある「Follow Out 1」セレクタボタンをクリックします。
次に、Output Shadowing パネルを開き、以下のように入力してください。
電極の1組をジェネレーターまたはSpookyブーストのアウトプット1に、もう1組をアウトプット2に直接接続します。これで、両方の被験者は同じ周波数を受け取ります。
二つのリモートによる伝染病対策(リモート)
一部のプログラムではSpookyブーストの使用が必要ですが、Spooky2では、1台のジェネレーターに直接接続した2台のリモート、またはSpookyブーストのパススルーアウトに接続した2台のリモートを使用することもできます。
Spooky リモートを1つ用意すれば、同じ症状の家族全員を簡単に治療できます。 しかし、2つあれば地域全体をケアできます。
ほとんどの人は、1人のDNAパッケージは複数の爪で構成されるべきだと考えています。 しかし、それは正しくありません。 完全な爪である必要はなく、爪の小さな部分で十分です。 爪を切る際に、各爪を3つまたは4つの小さな部分にカットし、リモートごとに1つの部分を使用する人もいます。
これより小さくすれば、Spooky リモートに最大50個のネイルセグメントを入れることができます。 爪の最も小さなかけらにもDNAが含まれています。
つまり、1つのジェネレーターに2つのリモコンを接続すれば、一度に最大100人まで対応できます。すべての人に、まるで1人だけをケアしているかのように、まったく同じ治療とパワーが提供されます。
必要なセットをロードし、すべてのプログラムの説明を確認して追加情報を確認します。次に、Follow Out 1 を選択して波形と関連設定をコピーすると、Spooky2 の本格的な操作の準備が整います。
これは、Out 1 から Out 2 に波形をコピーします。そのため、波形は同一です。
次に、以下の設定を行います。
これらはOutput Shadowingのデフォルト設定であることに注意してください。
デュアル電圧制御(リモート/コンタクト)
アウトプットシャドウイングが非常に強力であるもう一つの理由は、各アウトプットの信号に異なる振幅/電圧を割り当てることができることです。
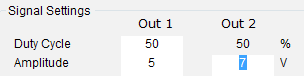
例えば、Out 1で5ボルトのプログラムを実行しているとします。今、あなたはHolland 11th Harmonicを追加したいと思っていますが、9ボルトで動作させたいと考えています。
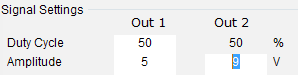
以下の2つ目の例では、Out 1の振幅は5ボルトです。Holland 11th Harmonicを7ボルトで動作させたいとします。
ウォブル&フェザリング

特定の病原体は、すぐに殺傷することが難しい場合があります。そのため、複数回の処置が必要になります。
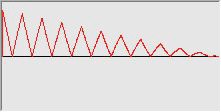
この方法で発生しうる問題のひとつは、治療に適応してしまうことで、根絶に時間がかかるようになることです。その解決策は、適用する周波数の正確な値、または振幅、あるいはその両方を常に細かく変化させることで、このような事態を防ぐことです。
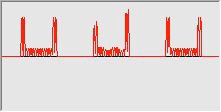
3つの方法があり、必要に応じてすべてを使用できます。最初の方法は、振幅と周波数の揺らぎです。後者はターゲット中心であり、すなわち、100 Hzの周波数は、99.5 > 99.75 > 100 > 100.25 > 100.5のように揺らぐことがあります。振幅の揺らぎはターゲットに向かって徐々に増加します。
上記のメニューでは、変更が適用される軌跡を表す3つの波形(のこぎり波、逆のこぎり波、三角波)から選択することができます。%フィールドでは、変更が適用される強度を指定します。また、右側のステップパラメータでは、変更が1つの値から次の値へと移行する際に、どれだけの離散的なステップまたは「ジャンプ」を行うかを指定することができます。
Amplitudeの場合、強度は10~15%が妥当な値であり、Frequencyは1%が適当です。
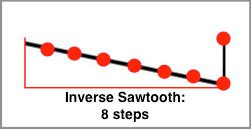
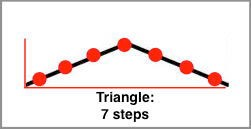

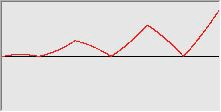
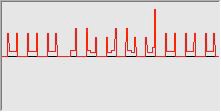
ステップとは、上の図の赤い点です。 波形の軌跡に沿った離散的な値です。 したがって、これらの揺れはスムーズかつ連続的に適用されるわけではなく、各ステップの位置から次の位置へとジャンプし、その間には値の変化はありません。 ステップの一般的なオプションとして、デフォルト値の16が適しています。
周波数 : 1000(1,000Hz/1KHz)
設定1 : +-0.02% フェザリング。
結果1 : 999.80~1000.20の間でランダム(ランダム化範囲=0.4Hz)。
設定2 :オクターブ12段階のウォブル。
結果2 : 1000、2000、4000、8000、16000、32000、64000、32000、16000、8000、4000、2000。
周波数:100000(100,000Hz/100KHz)
設定1:+-0.02% フェザリング。
結果 1: 99980~100020 のランダム(ランダム化範囲 = 40 Hz)。
設定 2: オクターブ 12 ステージのウォブル。
結果 2: 100000、200000、400000、800000、1600000、3200000 、6400000、3200000、1600000、800000、400000、200000。
周波数:1000000(1,000,000Hz/1MHz)
設定1:+-0.02% フェザリング。
結果1:999800~1000200のランダム(ランダム化範囲=400Hz)。
設定2:オクターブ12段階のウォブル。
結果 2: 1000000、2000000、4000000、8000000、16000000、32000000 、64000000、32000000、16000000、8000000、4000000、2000000。
フェザリングは、周波数に素早くランダムな変化を加えるため、設定された最大パーセンテージの範囲内で値が上下に変動します。ウォブルは、周波数に素早く制御された変化を加えるため、メニューで選択した内容に従って一定の値で変動します。それでは、これらの選択肢について詳しく見ていきましょう(F = 元の周波数)。
None: 変更を加えず、直接的に周波数を適用します。
+- .02% Feathering: 出力は設定周波数に対して、ランダムに上下に0.02%の範囲で急速に変動します。病原体の正確な周波数が不明な場合に有用です。リモート治療に最適です。
+- .05% Feathering: .02%のフェザリングと同じだが、変動が大きい。
周波数には、数学的な「親戚」であるハーモニクスがあります。高次のハーモニクスは非常に強力です。これらのオプションは、以下のような高速かつ連続的なハーモニクスのステップシーケンスを作成します。
.02% 4 Stage Wobble: F, F+.02%, F, F-.02%
.02% 8 Stage Wobble: F, F+.01%, F+.02%, F+.01%, F, F-.01%, F-.02%, F-.01%
.05% 4 Stage Wobble: F, F+.05%, F, F-.05%
.05% 8 Stage Wobble: F, F+.025%, F+.05%, F+.025%, F, F-.025%, F-.05%, F-.025%
Octave 2 Stage Wobble: F, F × 2
Octave 4 Stage Wobble: F, F × 2, F × 4, F × 2
Octave 6 Stage Wobble: F, F × 2, F × 4, F × 6, F × 4, F × 2
Octave 8 Stage Wobble: F, F × 2, F × 4, F × 6, F × 8, F × 6, F × 4, F × 2
Octave 10 Stage Wobble: F, F × 2, F × 4, F × 6, F × 8, F × 10, F × 8, F × 6, F × 4, F × 2
Octave 12 Stage Wobble: F, F × 2, F × 4, F × 6, F × 8, F × 10, F × 12, F × 10, F × 8, F × 6, F × 4, F × 2
完璧な矩形波は奇数倍音で構成されています。spooky2は、これらをより高いものに変動させることで、より高い負荷をかけることができます。
Odd 2 Stage Wobble: F, F × 3
Odd 4 Stage Wobble: F, F × 3, F × 5, F × 3
Odd 6 Stage Wobble: F, F × 3, F × 5, F × 7, F × 5, F × 3
Odd 8 Stage Wobble: F, F × 3, F × 5, F × 7, F × 9, F × 7, F × 5, F × 3
Odd 10 Stage Wobble: F, F × 3, F × 5, F × 7, F × 9, F × 11, F × 9, F × 7, F × 5, F × 3
Odd 12 Stage Wobble: F, F × 3, F × 5, F × 7, F × 9, F × 11, F × 13, F × 11, F × 9, F × 7, F × 5, F × 3
フィボナッチ数列は、自然界における有機的な成長パターンにいたるところで見られます。優れた成果を得るための優れた選択肢です。
Fibonacci 3 Stage Wobble: F, F, F × 2
Fibonacci 5 Stage Wobble: F, F, F × 2, F × 3, F × 2
Fibonacci 7 Stage Wobble: F, F, F × 2, F × 3, F × 5, F × 3, F × 2
Fibonacci 9 Stage Wobble: F, F, F × 2, F × 3, F × 5, F × 8, F × 5, F × 3, F × 2
Fibonacci 15 Stage Wobble: F, F, F × 2, F × 3, F × 5, F × 8, F × 13, F × 21, F × 34, F × 21, F × 13, F × 8, F × 5, F × 3, F × 2
自然対数は、1 + 1÷(1×2) + 1÷(1x2x3) + 1÷(1x2x3x4) + 1÷(1x2x3x4x5) … などの数学的公式に基づいています。
しかし、高調波の周波数の計算にも使用できます。
非常に尊敬されているあるRife開発者は、それのみを使用することを推奨していますが、当社のテストでは、その意見に同意する結果には至りませんでした。
Fibonacci 11 Stage Wobble: F, F, F × 2, F × 3, F × 5, F × 8, F × 13, F × 8, F × 5, F × 3, F × 2
Fibonacci 13 Stage Wobble: F, F, F × 2, F × 3, F × 5, F × 8, F × 13, F × 21, F × 13, F × 8, F × 5, F × 3, F × 2
Natural Log 2 Step Wobble: F, F × 20.0855369232
Natural Log 4 Step Wobble: F, F × 20.0855369232, F × 403.4287934927, F × 20.0855369232
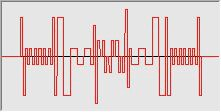
ここに表示されている波形の記号は、混乱の原因となっています。Spooky2で正方形または逆鋸歯状波を選択したのに、なぜこの波線が表示されるのか、ユーザーは疑問に思っています。
実は、Spooky2はソフトウェア上で任意波形としてすべての波形を作成し、それをジェネレータにダウンロードします。そして、Spooky2–XMディスプレイ上のこのくねくねした記号は、ジェネレータに内蔵された波形ではなく、任意波形が使用されていることを示すだけなのです。謎が解けました!
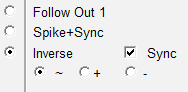
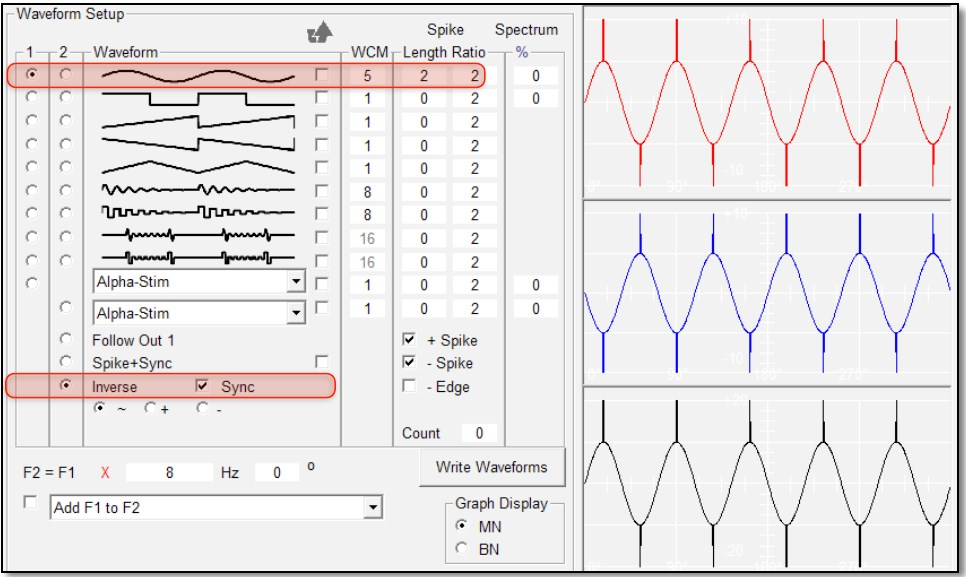
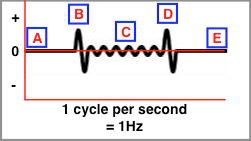
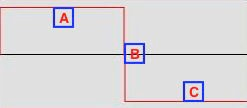
反転と同期
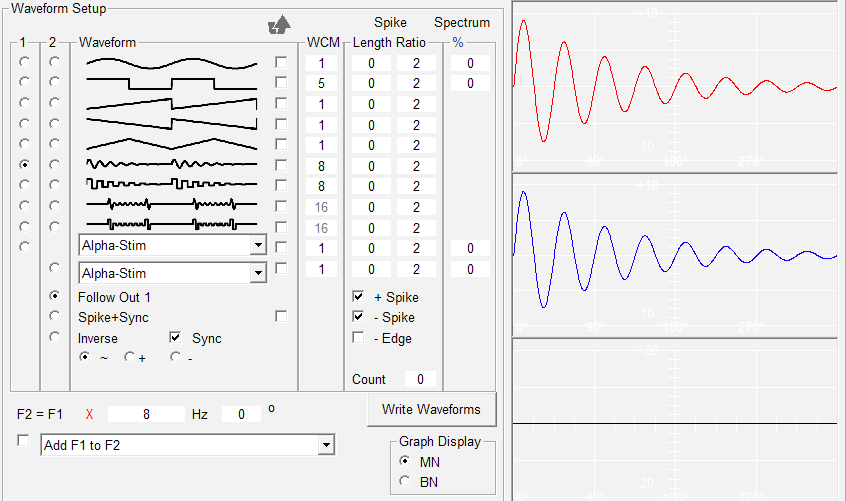
これを明確に理解するには、リストの下部にある3つの異なるオプションが選択された際に、Out 1とOut 2の波形に何が起こるかを確認してください。いずれの場合も、波形は正弦減衰します。
左側では、Follow Out 1 と Sync が選択されています。Out 1 の信号が Out 2 にコピーされています。赤と青の波形が同一であるため、このことがはっきりとわかります。
最初のピークでは、両方の波が同時に0から+10に移動します。そのため、この正のピークからの総エネルギーは、各出力から10ボルトとなります。
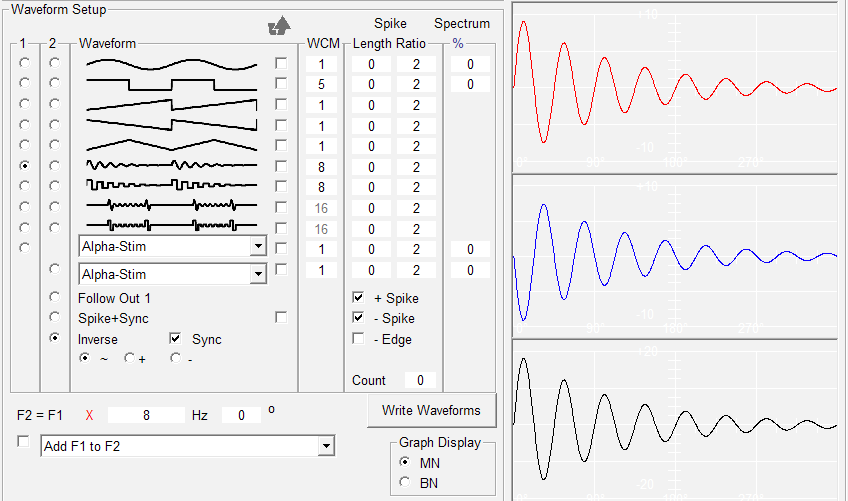
2つ目では、唯一の違いは、[Follow Out 1] の代わりに [Inverse] を選択している点です。一見したところ、赤と青の波形は変化していないように見えます。
しかし、よく見てください。青いものはもはや赤いものの正確なコピーではありません。代わりに、それは鏡に映った逆像です。
最初のピークを越えると、赤い波は0から+10に移動し、同時に青い波は0から-10に移動します。
つまり、この正のピークから得られる最大電位は、各出力から20ボルトとなります(-10と+10の差は20であるため)。
そして、この電子機器の魔法のような仕組みにより、Out 1の初期10ボルトの信号が、InverseとSyncを組み合わせた2つの出力を使用することで、20ボルトの強力な信号になる仕組みが説明されています。
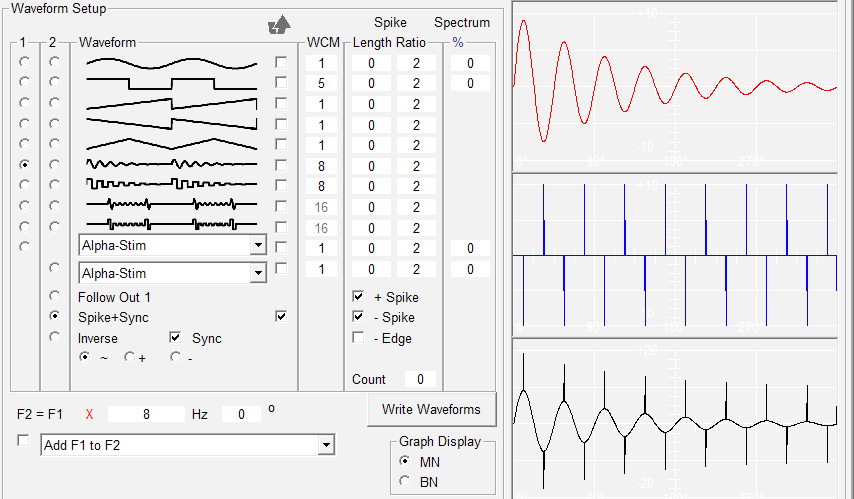
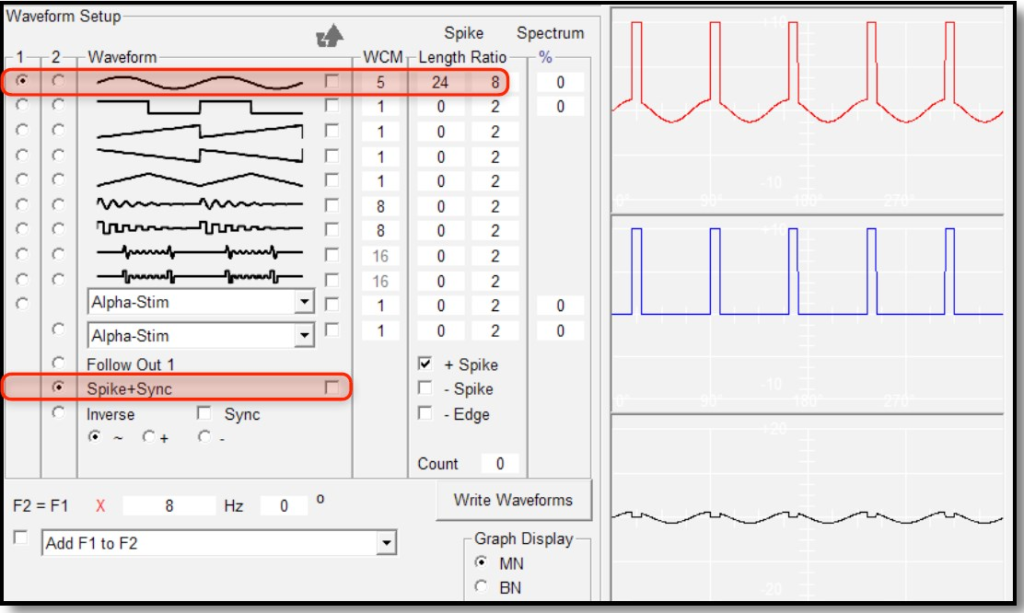
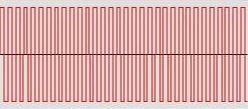
しかし、Out 2でSpike+Syncを選択し、右側のInvertチェックボックスにチェックを入れると、波にはかなり異なる変化が現れます。
複合波形の各サブ波(WCMの項目を見ると8つあることが分かります)に対して、Spooky2はOut 2の正と負のピークごとに1つの高電圧スパイクを注入します。
これらのスパイクは非常に強力であり、好みに合わせて調整することができます。しかし、細胞エレクトロポレーション(電気穿孔法)の技術的要件に基づいているとはいえ、細胞壁を開くにはより高い電圧が必要です。
しかし、これは、最も頑強な病原菌や寄生虫を叩きのめすためのユニークで非常に強力な方法を提供します。
しかし、時間こそが重要な特定の急性または非常に進行した症状に対しては、Spooky Central/Plasmaは、病原菌の細胞壁に穴を開けてミリ秒単位で殺菌し、がん細胞を破壊してプラズマを介してライフ周波数を送り込み、素早く破壊する、迅速かつ効果的なエレクトロポレーションを提供します。
では、この素晴らしいパワーをどのようにして操り、制御するのかをお見せしましょう。まずは、ジョンがInverseとSyncを紹介する際に使用した画面から始めます。かつてのSpooky Teamのメンバーがこれを見たとき、彼はこれを「チェーンソー・ウェーブ」と呼びました。
Syncチェックボックスにチェックが入っていない場合、Out 1とOut 2の周波数が異なると、Out 1とOut 2の出力は同期されません。ただし、周波数が同じであれば、Syncチェックボックスにチェックが入っていなくても、タイプ出力は自動的に同期されます。
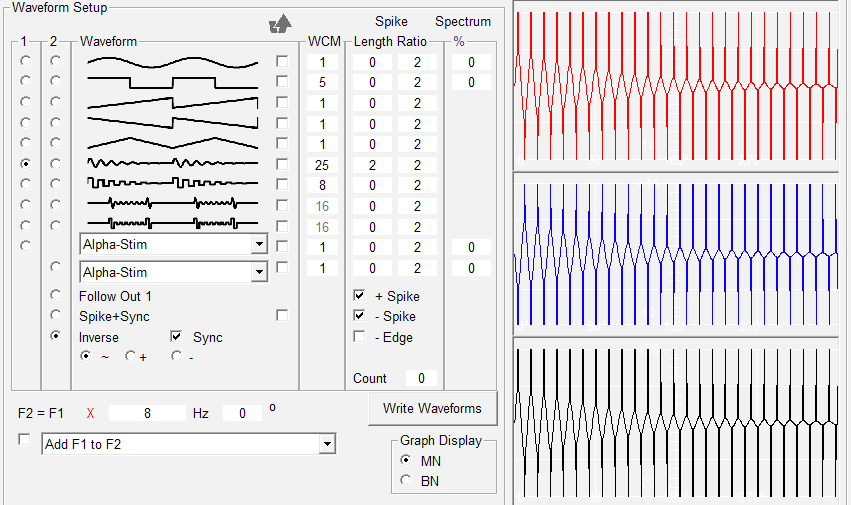
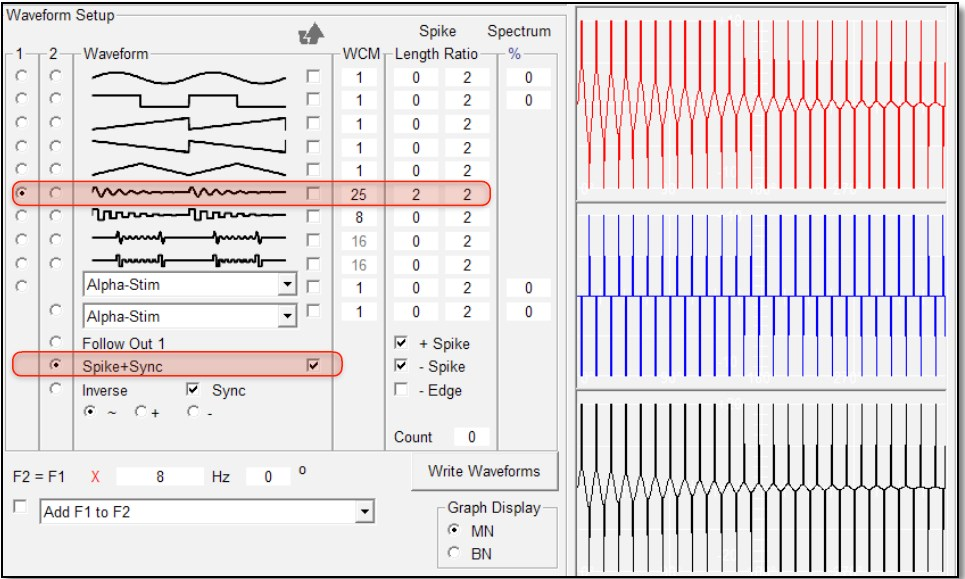
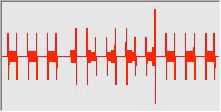
これは、サイン波減衰の1サイクルがチェーンソー波に変換されたものです。ご覧の通り、非常に多くのスパイクがあります。正確には50個あり、そのうち25個が正、25個が負です。スパイクの数は、合成波を構成するサブ波の数によって制御されます。WCMフィールドには25が入力されています。
スパイクの長さは、スパイクが適用される長さを制御します。10,000 Hzを超える周波数には2、それより低い周波数には1が適しています。スパイク比率は、スパイク振幅が他の波形と比較してどの程度強力であるかを決定します。
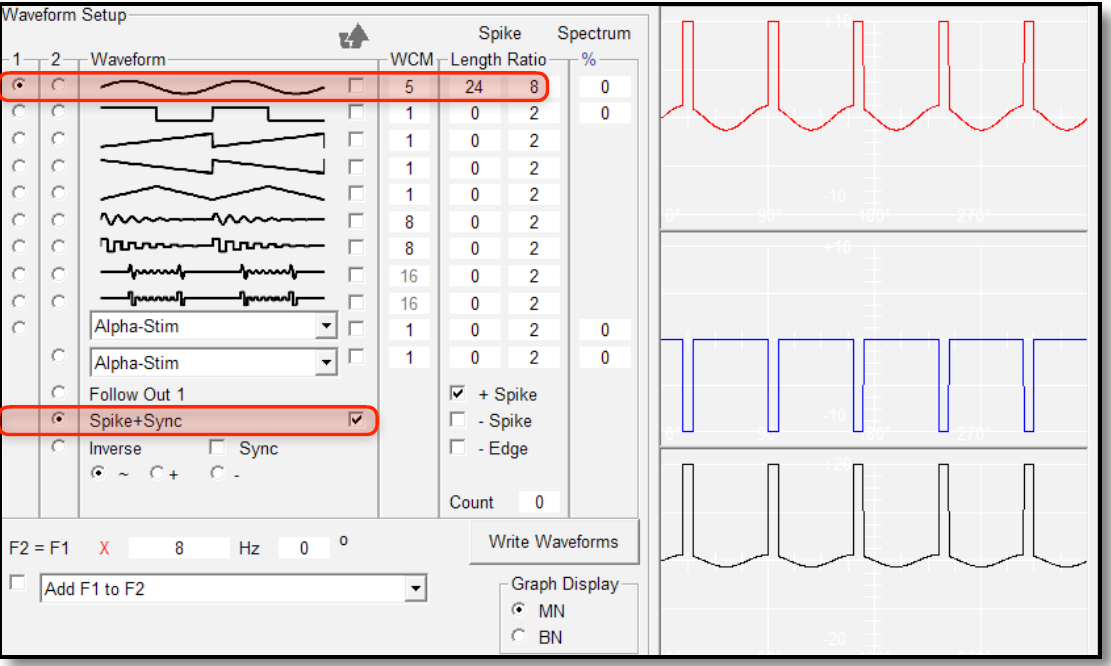
これらの制御をより明確に示すために、もう少し見づらくないもの、つまり、単純な正弦波を使用します。
これが、5つのサブ波(WCM = 5)で構成された正弦波です。正と負のピークそれぞれに電圧スパイクがあり(+スパイクと-スパイクの両方にチェックマークが付いています)、それぞれが2つの時間単位で送信されます(スパイクの長さ = 2)。
スパイク比は2に設定されており、これは各スパイクの振幅が全体の波形の2倍であることを意味します。曲線はウィンドウの上下の半分までしか上昇せず、下降もしないことが分かりますが、各スパイクは最後まで到達しています。
それでは、スパイクの長さとスパイクの比率を変更して、それらがもたらす違いを見てみましょう。
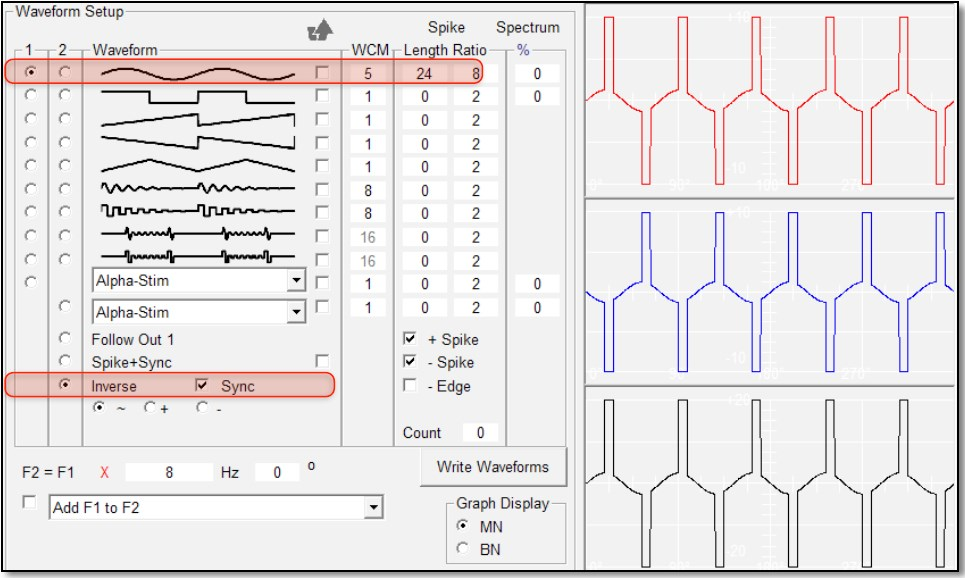
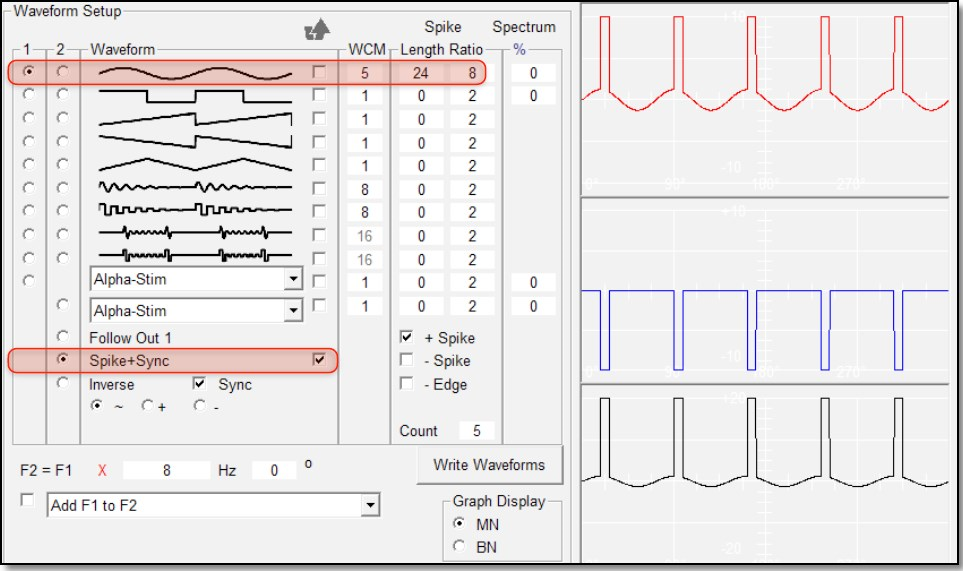
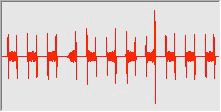
ここではスパイクの長さを24に、スパイクの比率を8に変更して、何が起こっているのかを明確に示しています。各スパイクの物理的な幅(左から右への時間軸)は明らかに増加しており、その下にある親波の高さ(垂直の電圧軸)は減少していますが、スパイクの高さ(電圧/振幅)は同じままです。図示されているスパイクの長さ24は、入力する値としては適切ではありません。なぜなら、長くなると高い電圧が印加されるためです。これは、接触モードでは痛みを伴う可能性が高いです。この値は、波形の形状がどのように変化するかを示しているだけです。
OK、では、他のスパイクコントロールは何をするのでしょうか?
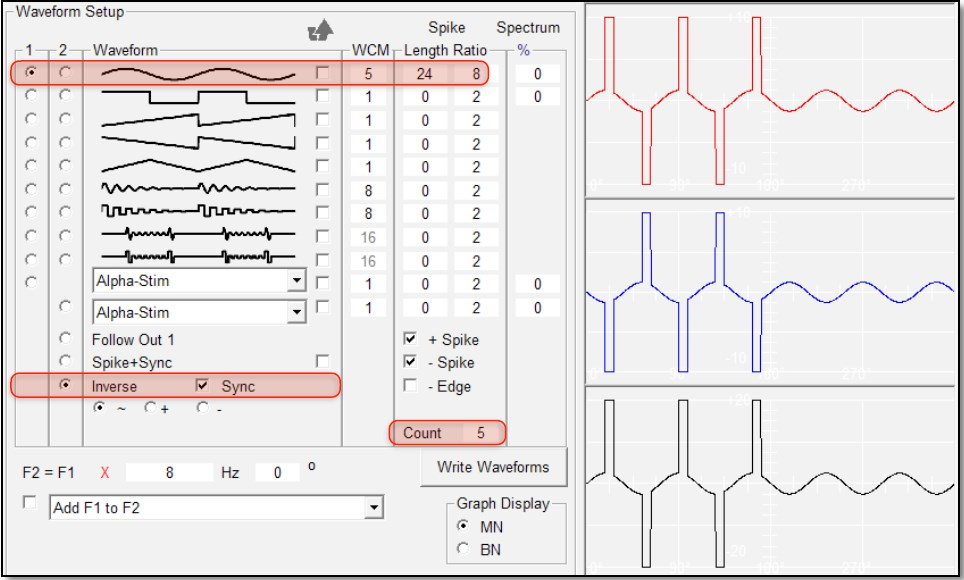
これらは、前のグラフとまったく同じ設定です。唯一変更した点はスパイクカウントだけです。Spooky2は、私たちが望むスパイク数(5)を表示しています。すべてのピークにスパイクを表示したい場合は、ピークを数えてから結果を入力する必要はありません。スパイク数に「0」を入力すれば、自動的に処理されます。スパイク数を減らしたい理由があるでしょうか? 病原菌をバランスを崩した状態に保ち、攻撃のリズムに「乗る」チャンスを大幅に減らすことができます。
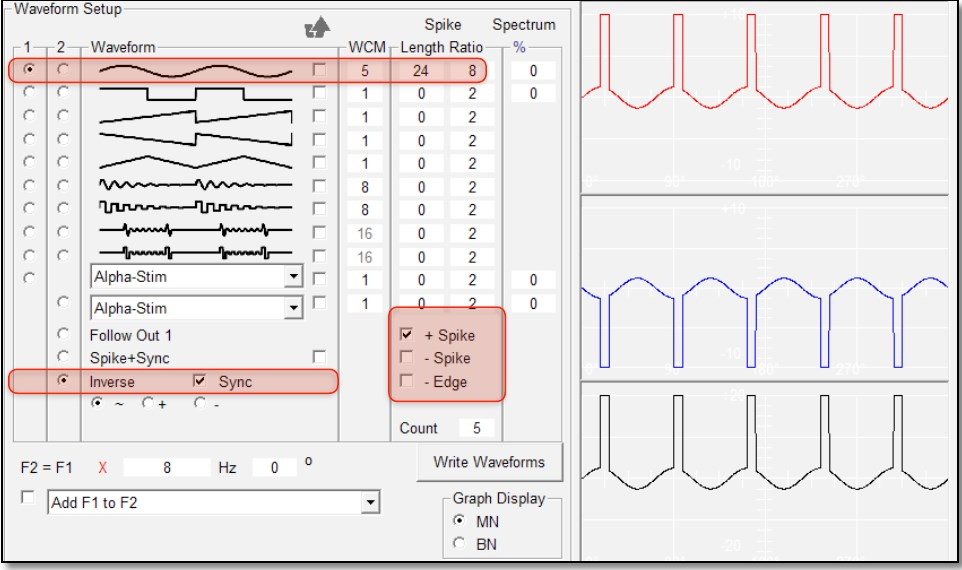
以前と同じ設定ですが、今回は負のピークのスパイクを送信しないようにしました。 欠落していた負のスパイクが正のスパイクの数に加えられ、合計5つのスパイクが残りました。 なぜこのようなことをするのでしょうか? それは、実験がライフィングについてより深く学ぶための最良の方法であり、Spooky2がまさにこのようなことを可能にするからです。
Spooky2でこれらの値を入力している場合は、InverseとSyncが選択されていると、Output Shadowingの2行目がグレー表示になっていることがわかるでしょう。これは、Out 2がOut 1の波形をコピーして反転しますが、同じ周波数を使用しているためです。
ここで興味深い展開があります。InverseとSyncの代わりに、Spike+Syncを選択しました。Out 2の青い波形を見てください。曲線状の親波形は生成されず、スパイクのみが生成されています。これは、Out 2のすべてのパワーがスパイクに使用され、基本となる波形には使用されていないことを意味します。さらに、Spike+Syncテキストの右にあるチェックボックスにチェックマークを入れることで、Out 2 のスパイク波形全体を反転させました。この反転により、スパイクの相殺を回避することができます。この意味を確かめるために、チェックマークを外してみてください。チェックマークを外すと、出力波形にスパイクはまったく発生しなくなります。
これは、Johnの逆正弦減衰波のオリジナル例を使って、スパイクを正しく行う方法の別の例です。逆正弦減衰波の代わりにスパイク+同期を設定すると、このような結果になります。繰り返しになりますが、アウトプット2はかなり恐ろしいものに見えますが、波形反転コントロールが導入される前は、これらの恐ろしいスパイクはすべて互いに相殺され、非常に弱々しい波形が残されていました。しかし、もはやそうではありません。出力波形のパネルから分かるように、今や恐ろしいチェーンソーのような波形が得られ、病原体に深刻なダメージを与える準備が整いました。しかし、それだけではありません。波形反転システムはさらに柔軟です。
正弦波の例に戻って、これをはっきりと見てみましょう。この画像は、Out 1 の正弦波に、Spike Length/Spike Ratio コントロールで追加したスパイクを示しています。Spike+Sync が選択され、Invert Waveform ボックスにチェックマークが付いています。ほとんどの場合、これはまさにあなたが望むものです。
ただし、Spike+Sync の波形だけでなく、リスト内のすべての波形を反転させることができます。ここでは、Spike+Sync の波形ではなく正弦波を反転させるために、「波形を反転」ボックスにチェックを入れ、「Spike+Sync」ボックスのチェックを外しました。両方の画像の出力波形のウィンドウを比較すると、2つの異なる出力信号がはっきりと見えます。これらは互いに鏡像の関係にあります。しかし、まだあります…
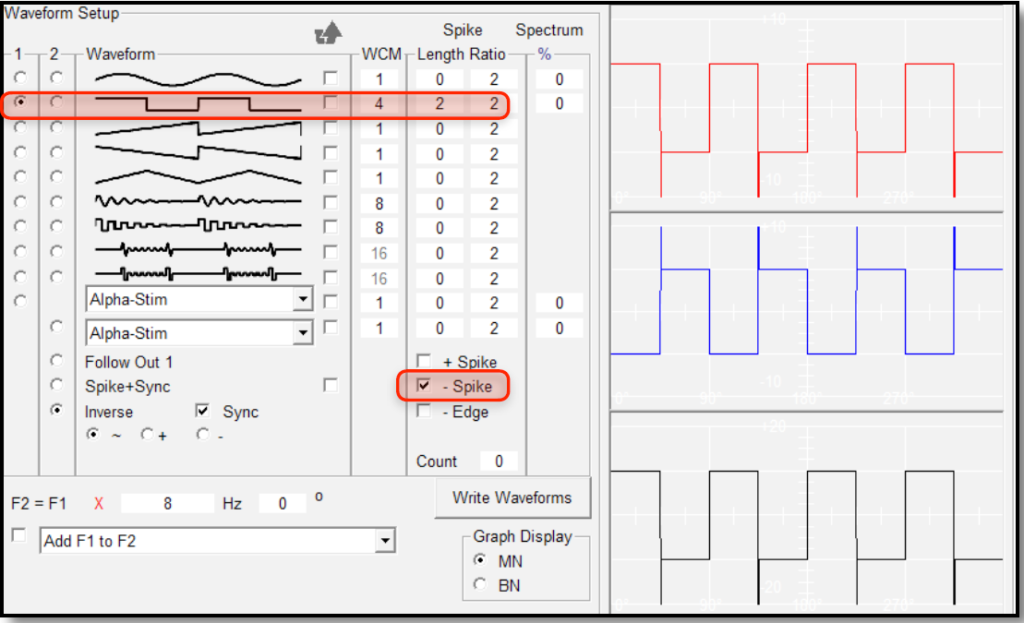
これをより明確に示すために、WCM列に4を入力して波形を方形波に変更し、4つのサブ波を1つの波サイクルに折り込みました。スパイクコントロールにチェックマークが付いています。すべてのサブ波の立ち上がりエッジにスパイクがあり、すべてが負の位相にあることが分かります。
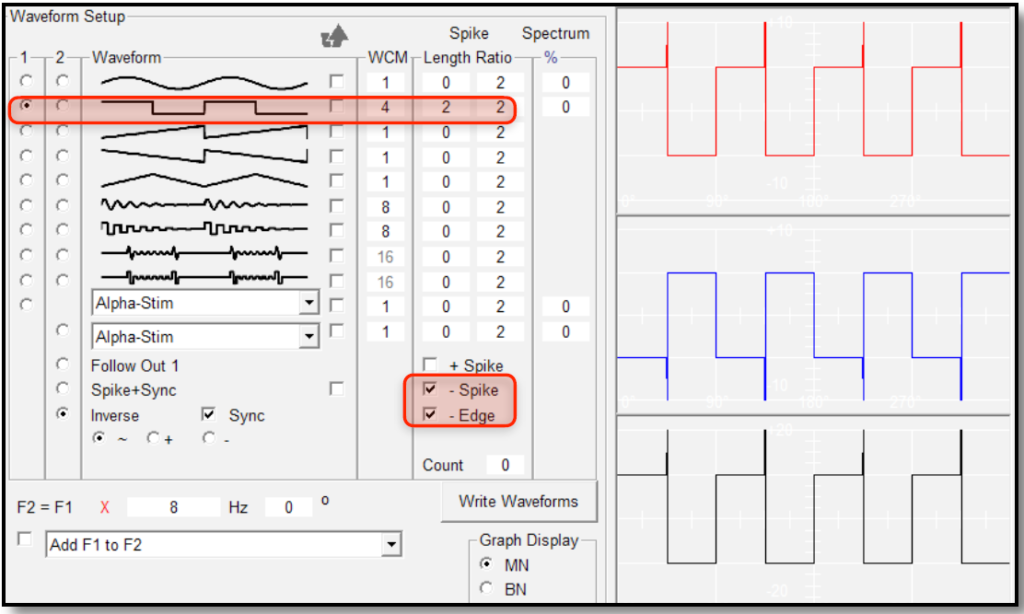
次に、エッジコントロールにもチェックマークを付けました。スパイクはすべて依然として負の位相にありますが、今度はサブ波の立ち下がりエッジに移動しました。これこそが、制御と呼ぶにふさわしいものです!
波形および周波数
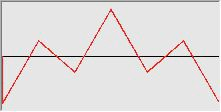
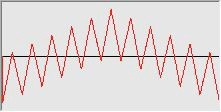
波形は一見すると不可解に見えるかもしれませんが、実際には非常にわかりやすいものです。 波形は、エネルギーの振幅またはパワーが時間とともにどのように変化するかをグラフィカルに表したものです。 Spooky2の波形を見てみましょう。 左側の縦の赤い線は、0を境に正と負の振幅を測定しています。 下部の横の赤い線は時間を表しており、1秒です。
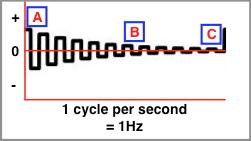
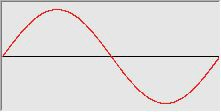
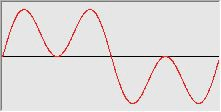
正弦波(Sine Wave)
下図のすべての波と同様に、この波も1秒間に1サイクルを完了するので、その周波数は1Hzです
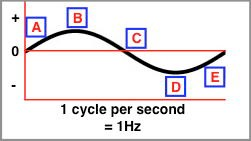
A: 振幅がゼロからプラス方向に変化しながら上昇する。
B: 振幅が最も高いプラス地点、すなわちピークに達した。
C: 振幅が0を下回り、マイナス方向に変化しながら継続する。
D: 振幅が最も低いマイナス地点、すなわちピークに達した。
E: 振幅が再びプラス方向に変化しながら動き始める。
用途 : ヒーリング、デトックス、殺傷(非常に高い周波数で)。
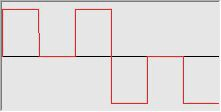
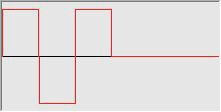
矩形波(Square Wave)
これも1秒ごとに1サイクル完了するので、周波数は1Hzです。
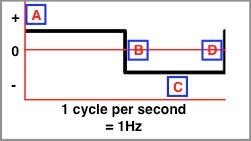
A: 振幅は、一定の割合で最高値のプラスレベルで推移している。
B: 振幅はすぐに0を下回り、マイナスのピークに達する。
C: 振幅は、一定の割合で最低値のマイナスレベルで推移している。
D: 振幅はすぐに0を通過し、ピークのプラスレベルに達する。
用途 : 殺傷、ヒーリング、デトックス。
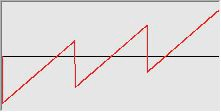
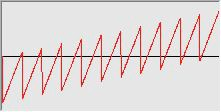
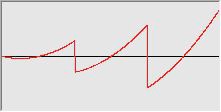
ノコギリ波(Sawtooth)
これは1秒で1サイクルを完了するので、周波数は1Hzです。
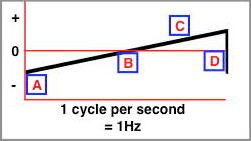
A: 振幅は、負のピークから正の方向に一定の速度で移動する。
B: 振幅は0を通過し、最も高い正のピークに達する。
C: 振幅は、正の方向に一定の速度で移動し続ける。
D: 振幅はすぐに0を通過し、負のピークに達する。
効能 : ヒーリング、デトックス。
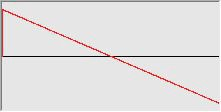
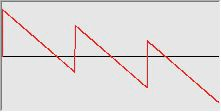
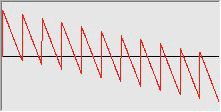
逆ノコギリ波(Inverse Sawtooth)
これは1秒で1サイクルを完了するので、周波数は1Hzです。
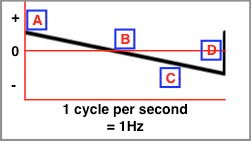
A: 振幅は、正のピークレベルから一定の割合で減少する。
B: 振幅は0を通過する。
C: 振幅は、一定の割合で負の方向に動き続け、最も低い負のピークに達する。
D: 振幅はすぐに0を通過し、正のピークレベルに達する。
用途 : 殺傷
ノコギリ波と逆ノコギリ波は、互いに鏡に映したような関係にある2つの波形です。ノコギリ波は常にゆっくりと上昇し、急激に下降しますが、逆ノコギリ波は常にゆっくりと下降し、急激に上昇します。些細な違いのように思えるかもしれませんが、実際には非常に重要であり、異なる結果については後のセクションで説明します。
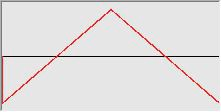
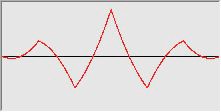
三角波(Triangle)
これも1秒で1サイクル完了するので、周波数は1Hzです。
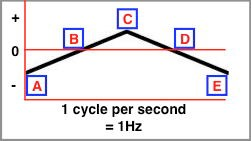
A: 振幅は、負のピークレベルから一定の割合で移動する。
B: 振幅は0を通過する。
C: 振幅は正のピークレベルに達し、その後一定の割合で下降し始める。
D: 振幅は0を通過する。
E: 振幅は負のピークレベルに達する。
用途: 正弦波の直線的な代替として、実験的に使用するのに適しています。
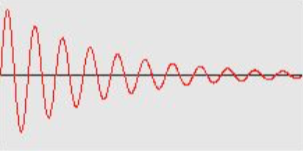
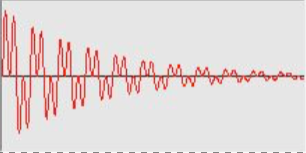
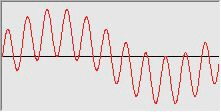
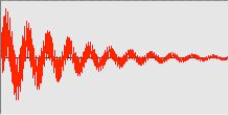
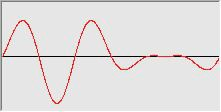
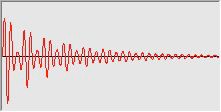
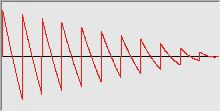
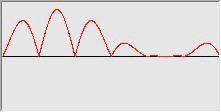
減衰正弦波(Damped Sinusoidal)
これは、末期がん患者14人と末期結核患者2人の治療に用いられたことで知られる、ロイヤル・レイモンド・ライフ博士の有名な減衰正弦波を再現したSpooky2の独占的なものです。これは、これ以降のすべての波とは異なっています。12個の内部サインのシーケンスで構成されており、それぞれが正から負へと徐々に減衰するサイクルを持っています。Spooky2は、出力周波数が常に正確になるよう、すべての複合マルチサイクル波形を自動的に補正します。
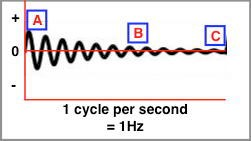
A: 振幅はピークレベルにある。
B: 振幅は、12の内部サイクルで徐々に減衰し、それぞれにおいて正から負の0を通過する。
C: 振幅はすぐにピークの正レベルまで戻る。
用途 : ヒーリング、デトックス、殺傷(非常に高い周波数で)。
Spooky2 注記 : 単一の複合サイクルにおける内部サイクルの総数は、[Wave Cycle Multiplier] フィールドに入力した値(この場合は 12)によって制御。
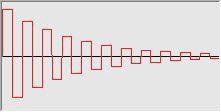
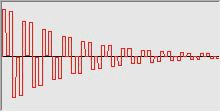
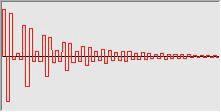
減衰矩形波(Damped Square)
減衰正弦波の原理に基づく新しい波形。12の内部方形波が徐々に減衰し、Spooky2が合成波形を自動的に調整して、送信周波数を正確にします。
A: 振幅はピークレベルにある。
B: 振幅は、12の内部サイクルで徐々に減衰し、それぞれにおいて正から負の0を通過する。
C: 振幅はすぐにピークの正レベルまで再び上昇する。
効能 : 殺傷、ヒーリング、デトックス。
Spooky2 注記 : 単一の複合サイクルにおける内部サイクルの総数は、[Wave Cycle Multiplier] フィールドに入力した値(この場合は 12)によって制御。
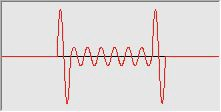
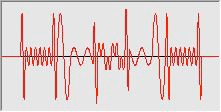
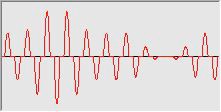
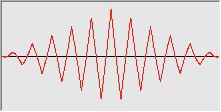
水爆正弦波(Sine H-Bomb)
減衰正弦波に基づくもう一つの新しい波。技術的には、より複雑でデューティサイクルの計算を伴います。8つの内部正弦波サイクルから構成され、合成波形は自動的に調整され、送信周波数が正確になります。
A: 振幅は0である。
B: 振幅は急激に上昇し、正のピークレベルに達した後、急激に0まで下降し、負のピークレベルに達する。その後、再び急激に上昇し、0に戻る。
C: 振幅は6つのより小さな内部サイクルを経る。
D: ステップBを繰り返す。
E: ステップAを繰り返す。
用途 : ヒーリング、デトックス、殺傷(非常に高い周波数で)。
Spooky2 注:単一の複合サイクルにおける内部サイクルの総数は、[Wave Cycle Multiplier] フィールドに入力した値(この場合は 8)によって制御されます。
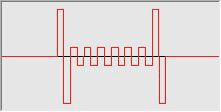
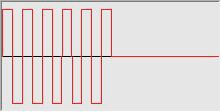
水爆矩形波(Square H-Bomb)
これは減衰矩形波の原理に基づく3つ目の新しい波形です。8つの内部矩形波サイクルから構成されており、Spooky2は合成波形を自動的に調整して、送信周波数を正確にします。
A: 振幅は0である。
B: 振幅はすぐに正のピークレベルまで上昇し、その後すぐに0を通って負のピークレベルまで移動し、その後すぐに0まで上昇する。
C: 振幅は上昇し、6つのより小さな内部サイクルを経て進行する。
D: ステップBを繰り返す。
E: ステップAを繰り返す。
効能 : 殺傷、ヒーリング、デトックス。
Spooky2注: 単一の複合サイクルにおける内部サイクルの総数は、[Wave Cycle Multiplier] フィールドに入力した値(この場合は8)によって制御されます。
では、まとめてみましょう。
周波数とは、あるエネルギーが1秒間に正の状態から負の状態に変化する回数のことです。
波形は、このような変化の過程でエネルギーのパワーがどのように増減するかを視覚的に表したものです。
しかし、まだ終わりではありません。波形の挙動に大きな影響を与える、2つの重要な特性について見ていく必要があります。
1つ目はオフセットで、これはすべての波形に適用されます。2つ目はデューティサイクルで、これは単純な矩形波のみに適用されます。
波形とオフセット
通常の波形には正と負の2つの位相があることはご存知でしょう。 実際には、正のエネルギーが波形の半周期にわたって適用され、負のエネルギーが残りの半周期にわたって適用されることを意味します。 著名なエネルギー医学の研究者の中には、特にハルダ・クラーク博士が、病原体を殺傷するには単方向のエネルギーのみを適用する方が効果的であると主張しています。 これを実行するには、オフセットを使用します。
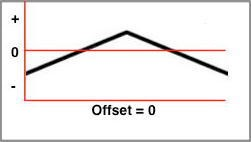
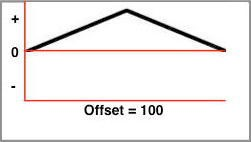
オフセットの効果を明確に確認できるように、ここでは三角波を選択しました。この波形のオフセットは0%です。
波は、そのサイクルの50%が正の局面(赤の0ラインより上)にあり、残りの50%が負の局面(赤の0ラインより下)にあります。

通常、ゼロオフセット波形を入力する際の設定は上記のようになります。
上のグラフでは、これは依然として同じ三角波形ですが、グラフ上の位置は現在異なっています。
私たちは100%のポジティブオフセットを与え、波は現在、そのサイクル全体において完全にポジティブな局面にあります。

上記は、Spookyブーストを使用して反転と同期にした場合の、正のオフセット100%の設定です。反転と同期の代わりにFollow Out 1を使用する場合は、両方のアウトプットの値を100と100(いずれも正)に設定します。アウトプット1のみに直接接続する場合は、-100の代わりに0を入力します。
正のオフセットを使用する場合、忘れてはならない非常に重要なことがあります。それは、利用可能な振幅への影響です。
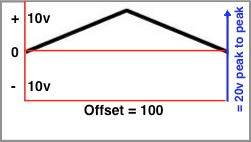
Spooky2-XMジェネレーターの電圧範囲は、-10ボルトから+10ボルトです。これは、最低の負のピークから最高の正のピークまでを測定した場合、合計で20ボルトの範囲となり、ジェネレーターの出力はピーク・トゥ・ピークで20ボルトとなります。
しかし、ここでは100%の正のオフセットを適用し、波形を正の位相のみに押し上げているため、潜在的な負の位相に利用可能な電圧は使用されていません。これは、信号のどの部分も現在負ではないためです。
その結果、任意の波形にオフセットを適用すると、信号の全体的な振幅が減少する可能性があります。
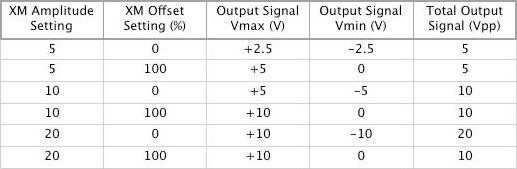
Vmax = 最大電圧。Vmin = 最小電圧。Vpp = ピーク・トゥ・ピーク電圧。
ノート:100%オフセットを適用すると、SpookyリモートのLEDが1つだけ点灯します。これは正常な動作です。
デューティサイクル
多くのライフ技術の初心者にとって、デューティサイクルは理解しにくい概念です。そこで、できるだけ明確に説明してみましょう。すべての波形にはサイクルがあります。これは、波形の始まりから終わりまでの1回の完全な反復であり、次の波形サイクルではまったく同じパターンを繰り返します。
デューティサイクルもこれに関連していますが、厳密には1つのことだけを規定しています。すなわち、波のサイクルのどの期間において、信号が最大振幅で一定に保たれるかということです。そして、これが理解の鍵となります。少し前に、さまざまな波形について説明したことを思い出してみてください。それぞれの波形は常に振幅が変化していることを覚えているでしょう。ただし、1つだけ例外があります。それは、矩形波です。
矩形波はゼロから最大振幅までほぼ瞬時に達し、その後、一定の振幅を一定期間維持した後、ほぼ瞬時にゼロまで戻る。デューティサイクルは、一定の振幅が維持される期間の長さを制御するものです。そのため、デューティサイクルは、実際には単純な矩形波にしか適用できません。
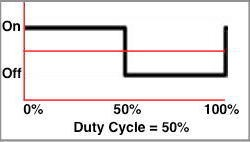
上図のものはデフォルトのデューティサイクルが50%です。これは、信号が波の自然サイクルの半分にわたってフル振幅で伝達され、次の波のサイクルが始まるまで「オフ」になることを意味します。
デューティサイクルを0%に設定すると、信号がまったく得られません。また、100%に設定すると、途切れることのない一定の信号が得られますが、いずれもライフ療法には適していません。
デューティサイクルは、矩形波の最大振幅が波の各サイクル内で一定に保たれる時間を制御します。その結果、デューティサイクルは組み込みのゲートのようなものと考えることができます。しかし、矩形波の性質により、デューティサイクルはこれよりもはるかに有用です。
矩形波は、3度、5度、7度、9度など、奇数倍音を自然に豊富に含んでいます。しかし、これらの倍音は瞬時に発生しているのではなく、まるでピアノの鍵盤を指で駆け上がるように、超高速の「グリッサンド」で徐々に明らかになっているかのようです。矩形波のデューティサイクルの値が大きくなるほど、「グリッサンド」が長く演奏されるため、より多くの倍音が現れます。そして、50%を大きく超えると、偶数次倍音も現れ始めます。
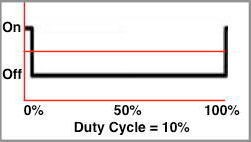
この矩形波のデューティサイクルは10%です。これは、波の周期全体の10%の期間に電力を供給し、残りの90%の期間はオフになることを意味します。
50%未満のデューティサイクルはあまり実用的ではなく、純粋な実験目的でない限り、このようなことをしたいと思う理由は何も思い当たりません。
より有用な値は50%以上であり、経験豊富なライファーの多くが67%、72%、81%、93%を推奨しています。

一方、デューティサイクルが90%の矩形波は、波の周期の90%の期間は一定の振幅で電力を供給し、残りの10%の期間は電力を供給しません。
これは、以前の例と比べると、ずっと役立つものです。
しかし、奇数および偶数倍音を自然に豊富に含む逆のこぎり波を使用することが病原体の殺傷にはより効果的であることが分かったと言わざるを得ません。また、単純なのこぎり波は、現在、ヒーリングとデトックスの用途において優れた実験結果をもたらしています。
Spookyリモートを理解する
Spooky リモートは、Spooky2-XMジェネレーターが利用可能になる前に発表されました。そのため、これに対応するジェネレーターはUDB1108Sのみでした。当時、このジェネレーターのキャリブレーションは、マルチメーターを使用して手動で行う必要がありました。
この安価で手軽なユニットのコンポーネントは、時間の経過とともにドリフトする傾向があったため、少なくとも月に1回、できれば毎週キャリブレーションルーチンを行う必要がありました。UDBを大量に使用している場合は、これは骨の折れる作業でした。
しかし、Spooky リモートは、マルチメーターを必要とせずに素早く簡単にキャリブレーションを行う、非常にシンプルな方法を提供しました。
すべてのリモコンには2つの赤色LEDが搭載されています。一方のLEDは信号のプラス部分を使用して発光し、もう一方のLEDは信号のマイナス部分を使用します。「シグナルテスト」セットをロードして実行すると、まず「AMPLITUDE」ノブを最大まで上げ、次に「OFFSET」ノブを調整して、両方のLEDが同じ明るさで光るようにします。
そうしたとき、あなたのセットアップはキャリブレーションされました。つまり、信号のプラス面とマイナス面が同じ強さになったということです。言い換えれば、信号のオフセットがゼロになったということです。つまり、プログラムの途中でも、何度でも再キャリブレーションが可能だったということです。そして、適切にキャリブレーションされた周波数を常に適用することが、Remoteが広く使用されるようになってから現れ始めた優れた結果の少なくとも一部の原因であると私たちは考えています。
しかし、Spooky2ソフトウェアでユーザーが振幅とオフセットの値を入力して較正するSpooky2-XMジェネレーターが導入されてからは、リモートLEDは、信号が送信されていることをユーザーに知らせる以外の目的はないように思われました。
多くのユーザーが混乱しました。
LEDが1つしか点灯しない、あるいはどちらも点灯しないなど、不可解なLEDの挙動が報告されています。しかし、「知識」を持つ人々にとっては、これはすべて正常であり、
実は、LEDは見た目よりもずっと便利で、その仕組みを理解すれば、ジェネレーターで何が起こっているかを一目で判断できるようになります。
LEDが信号にどのように反応するかを制御する要素は3つあります。周波数、波形、振幅です。以下のグラフィックは、オシロスコープを所有していない元SpookyチームのメンバーがSpooky2で作成したものです。以下のグラフィックは、Wave Cycle Multipliersを説明するために作成されたものです。まず、周波数について見てみましょう。
リモートと周波数
これは1Hzの矩形波です。1秒ごとに正から負へのサイクルを1回繰り返します。
A: 信号は0.5秒間プラスなので、左のLEDは0.5秒間点灯します。
B. 信号はすぐに0からマイナスまで下がります。
C: 信号は0.5秒間マイナスなので、右のLEDは0.5秒間点灯します。
LEDは非常にゆっくりと点滅し、同時に両方が点灯することはありません。
これが32 Hzの矩形波です。1秒間に32回の正から負へのサイクルを繰り返します。ピークを数えてみてください。32回です。
この周波数では、上述のA-B-Cサイクル全体が毎秒32回繰り返されます。
つまり、32サイクルのそれぞれにおいて、信号は1/64秒間だけ正であるため、左のLEDは1/64秒間点灯します。
その後、信号は1/64秒間マイナスになり、右のLEDが1/64秒間点灯します。
現在、LEDは両方とも高速で点滅しています。しかし、常にどちらか一方だけが点灯している状態です。
Wave Cycle Multiplierを12に設定すると、Spooky2-XMに送信される周波数は12で割られます。では、もう一段階上げてみましょう。

これが256 Hzの矩形波です。オシロスコープで実際に見るものは、このようには見えません。ここで直面しているのは、コンピュータ画面の解像度の限界です。しかし、1秒間に256サイクルあるため、それぞれのピークが互いに非常に接近しており、PC画面ではそれらの間にいくらかの分離があることを示すことができません。
現在、元のA-B-Cのポジティブからネガティブへのサイクルが毎秒256回発生しています。
そして、この256サイクルのそれぞれにおいて、信号は1/512秒間だけ正となるため、左のLEDは1/512秒間だけ点灯します。
その後、1/512秒間サイクルがマイナスになり、右側のLEDが1/512秒間点灯します。
今、それぞれのLEDは常に点灯しているように見え、同じ明るさです。しかし、ご存知の通り、信号が同時にプラスとマイナスになることはありえないため、それぞれのLEDが同時に点灯することは不可能です。つまり、今皆さんが目にしているものは、人間の目の限界による錯覚なのです。
同じような錯覚が、1秒間に約24枚の静止画を連続して伝送する映画を、現実の生活の複写のように見せているのです。
メガヘルツ帯の非常に高い周波数の送信を開始すると、異なる種類の限界に直面します。これは、毎秒何百万ものサイクルであり、現在の技術の限界です。
高域のMHz周波数では、サイクルが正から負に切り替わるのが非常に速いため、LEDが完全に点灯する前に再び消灯する信号を受信してしまいます。その結果、LEDが非常に暗くなり、完全に消灯したように見える場合もあります。
これは、Spooky2、ジェネレーター、またはリモートが動作しなくなったという意味ではありません。ただ、現在のLEDスイッチング技術では、非常に高速な信号で起こっていることについていくには十分な速度ではないということです。これは心配するようなことではありません。
リモートと振幅
しかし、LEDが非常に暗く見える、あるいはまったく点灯していないように見える別のシナリオもあります。この場合、非常に高い周波数はまったく関係ありません。
LEDが点灯するたびに、振幅(電圧とも呼ばれる)という周波数の原動力の非常に小さな割合が使用されます。約5ボルト以上の振幅では、LEDの輝度にほとんど違いは見られません。しかし、振幅をこれより低く設定すると、LEDを点灯させるのに利用できる電圧が低下し、LEDが暗く見えるようになります。振幅が非常に低いと、まったく点灯していないように見えるでしょう。
これも心配には及びません。 むしろ、周波数の電圧がすべて意図した目的(治癒)のために使用されていることを意味するので、むしろ良いことです。
リモートと波形
リモートのLEDが低周波数でどのように動作するかを見るだけで、チャンネルでどの波形が使用されているかについてかなり正確な見当がつくことを知ったら、驚かれるでしょうか?
すでに示したすべての例では、矩形波を使用しました。正極性でも負極性でも、電力は常に一定であり、正から負への変化はほぼ瞬時に行われます。
しかし、Spooky2のすべての波形には、正から負への切り替えの原理がまったく同じように適用されており、低周波数では、両方のLEDの明るさの変化が波形の実際の形状を反映していることがわかります。
ここで、元の波形グラフに戻って、何が起こっているのかを説明しましょう。
1 Hzの正弦波では、このようなことが起こります:

A: 正の振幅が増加するため、左のLEDは徐々に明るくなります。
B: 振幅が最大値に達したため、左のLEDは最も明るくなります。
C: 振幅が0以下に減少するため、左のLEDは暗くなり消灯し、右のLEDは明るくなり始めます。
D: 負の振幅が最小値に達したため、右のLEDは最も明るくなります。
E: 振幅が再び正になり始めたため、右のLEDは暗くなり始めます。
逆ノコギリ波の波形も、同じく 1 Hz です。

A: 正の振幅は一定の割合で減少するため、左のLEDはゆっくりと暗くなります。
B: 振幅が0を通過すると、左のLEDは消灯し、右のLEDが点灯します。
C: 負の振幅は一定の割合で増加するため、右のLEDはゆっくりと明るくなります。
D: 振幅は0を通過して正のピークに達するため、右のLEDは消灯し、左のLEDはすぐに完全に明るくなります。
1Hzの減衰正弦波を見てみましょう。

A: 振幅が最大なので、左のLEDは完全に点灯しています。振幅が減少すると、LEDは暗くなり消え、右のLEDは薄暗く点灯し、完全に点灯するまで明るくなります。
B: 振幅は、12回の内部的な上昇と下降により、プラスからマイナス、そして0を通って減少します。そのため、各LEDは12回連続して明るくなったり暗くなったりし、明るさは徐々に増減します。減衰した矩形波では、LEDは段階的に明るくなったり暗くなったりせず、単純に交互に点灯と消灯を繰り返します。
C: この時点では、振幅が低いため、両方のLEDが非常に暗く点灯しています。最後に、振幅がピークのプラスに戻り、サイクルが再び始まります。
Spooky リモートに 1 Hz の水爆矩形波 を入力した際の LED の挙動を予測できるようになっているはずです。

A: 振幅は0なので、どちらのLEDも点灯しません。
B: 振幅はすぐに正のピークレベルまで上昇し、その後0を通って負のピークレベルまで下降します。これは、左のLEDが完全に点灯し、その後右のLEDが完全に点灯すると消灯することを意味します。
C: 振幅は6つのより小さな内部スイッチを通過します。そのため、各LEDは6回連続して切り替わりますが、最初のピークと同じ明るさにはなりません。水爆正弦波では、LEDは点滅するのではなく、徐々に明るくなったり暗くなったりします。
D: ステップBが繰り返されます。
E: ステップAが繰り返されます。
最後に、先に進む前に、これまでのすべてをお読みになって、1つ非常に重要なことに気づかれたことでしょう。SpookyリモートのLEDは、周波数、波形、振幅によって電源が供給され、制御されています。
Spooky2がこれらの作成をジェネレーターに指示するプログラムを送信していない場合、リモートは当然それらを受け取ることができません。したがって、リモートのLEDはどちらも点灯することはありません。
あなたも今、「知識」を手に入れました。
さまざまな波形と非常に低い周波数、異なる振幅を自分で試してみると、それらの組み合わせによって異なる結果が得られることがご自身で確認できるでしょう。
少し練習と忍耐があれば、リモートのLEDを単に今日の緊急の技術的な質問に答える手段としてではなく、便利なツールとして使えるようになります。
「これはオンになっている?」
スペクトルを理解する
スペクトラムのパラメータがどのように出力信号に影響するかを説明し、いくつかの例を挙げていきます。これにより、全体像を把握できるようになるでしょう。しかし、スペクトラムについてまず理解すべきことは、それが何のために使用されるのかということです。
スペクトラムは、体内に侵入したあらゆる生物を殺傷するように設計されています。その主な目的は、ヒーリングでもなく、サポートでもなく、デトックスでもありません。ウイルス、バクテリア、真菌、カビ、酵母、寄生虫を退治すること、つまり処刑することが本来の目的なのです。ですから、スペクトラムを使用する際には、デトックスやサポートプログラムも併せて行うべきです。
まず最初に検討するのは、病原体の実際の周波数であるMortal Oscillatory Rate(致死振動数)です。病原体のMORに等しい周波数を送信すると、病原体はその周波数と共鳴します。これにより、病原体が死滅します。
次に検討するのは、致死振動率許容度です。ライフ博士は、病原体の致死振動率(MOR)のプラスマイナス0.025%の範囲内の周波数を使用した場合でも、病原体を殺傷できることを発見しました。致死振動率許容度とは、病原体の致死振動率に十分に近いため、病原体を殺傷するのに十分な共振を引き起こす周波数です。
これが非常に役立つことを理解していただくために、150 Hzと1,500,000 Hz(1.5 MHz)の2つの周波数を見てみましょう。150 Hzの許容誤差は0.0375 Hz(150 Hzの0.025%)であり、これは149.9625 Hzから150.0375 Hzまでの周波数であれば、MORが150 Hzの病原体を殺傷できることを意味します。興味深いですが、あまり実用的ではありません。
しかし、今日私たちが利用しているほぼすべての周波数は、上限周波数が10,000Hzまたは100,000Hzの機械で開発されたものであることを忘れてはなりません。しかし、ライ博士とクラーク博士は、病原体の実際の最小作用周波数はメガヘルツの範囲にあり、これらの機械では送信できないことを発見しました。
これは、過去の技術的限界により、依然として低調なサブハーモニックを扱っていることを意味します。しかし、その時代は終わりました。Spooky2は最大2500万ヘルツまで送信できます。そこで、MOR許容値が役に立つ場面です。
1,500,000 Hz(1.5 MHz)の許容誤差は375 Hzであり、これは1,499,625 Hzから1,500,375 Hzまでの周波数が、MORが1.5 MHzの病原体を殺すことを意味します。しかし、その範囲内のMORを持つ他のすべてのものも殺すことになります。
そして、それだけではありません。MHz帯域でMOR耐性が高まるということは、周波数を通してはるかに大きなステップを踏むことができ、それでも悪者を確実に倒せるということです。
3番目に注目するのは、パワー、つまり振幅です。
スペクトラムは、1つの「親」となる静止または移動周波数から、最大1,024の「子」周波数を同時に生成し、その周波数の上下に等しく広げる数学的な方法です。これは驚くべき成果ですが、現在送信中のすべての周波数に、ジェネレーターの使用可能な振幅が分割されていることを忘れてはなりません。
Spooky2-XMとGeneratorXジェネレータは最大20ボルトで動作します。
つまり、1,024の周波数を同時に発生させるスペクトルを構築した場合、それぞれの振幅は0.01953125ボルトとなり、これは1ボルトの50分の1以下です。これはリモートモードでは有用かもしれませんが、コンタクトモードでは役に立たないことは明らかです。コンタクトモードでは、皮膚を貫通するにははるかに高い電圧が必要です。
この問題に対する解決策は2つあります。1つ目は、送信する周波数の数を減らし、それぞれの周波数により多くの電力を割り当てる方法です。2つ目は、Spooky Central/Plasmaを使用する方法です。
スペクトラムは、周波数揺らぎを使用するよりも、設定された中心周波数を中心に周波数のクラスターを生成するはるかに効果的な方法です。揺らぎのある周波数は次々と生成されるため(直線的)、その持続時間は瞬間的なものとなります。スペクトラム周波数は並行して生成されるため、その持続時間はすべて中心周波数の持続時間と同じになります。
常に達成したいことを正確に計画しましょう。コツさえつかめば、できることに限界はありません。
それでは、まず用語を定義しましょう。
MORまたは中心周波数:これはスペクトルが中心となる周波数です。子周波数は、この周波数より上下に分布します。
MOR許容値または周波数許容値:これは、中心周波数またはMORからの距離の許容値であり、子周波数を離して配置できる値です。
Wave Cycle Multiplier (WCM): これは、生成する子周波数の数を設定する方法です。周波数は中心周波数の上下に生成されるため、生成する子周波数の数は、ここで入力する値の2倍になります。
周波数間隔(FS):これは、生成される子周波数の間の距離です。
スペクトル%:これは、周波数が生成される範囲を設定する方法です。スペクトルは、常に中心周波数のパーセンテージです。
中心周波数、MOR許容値、および波長サイクル倍数を選択する必要があります。それらから、周波数間隔とスペクトル%に必要な値を計算することができます。それでは、その計算式を見てみましょう。
- 必要な周波数間隔値を算出する公式は次のとおりです。
周波数間隔 = 中心周波数 × MOR許容値
- 必要なスペクトル%値を算出する公式は次のとおりです。
スペクトル%=波長サイクル倍数×100×周波数間隔÷中心周波数
いくつかの例を見てみましょう。
例1:周波数1.5MHz、MOR許容誤差0.025%、子周波数100個が欲しい。
したがって、1.5 MHz が中心周波数となり、MOR の許容誤差は 0.00025、WCM は 50(子周波数 100)となります。 中心周波数と、その上下の子周波数 50 を含めると、合計 101 の周波数となります。
したがって、周波数間隔は、1,500,000 Hzの中心周波数に、MOR許容誤差の0.00025を掛けたものとなります。
1,500,000 × 0.00025 = 375
そして、スペクトル%は、波長サイクル倍数50に100を乗じ、周波数間隔375 Hzを1,500,000 Hzの中心周波数で割った値となります。
50 × 100 × 375 ÷ 1,500,000 = 1.25
例2:周波数500Hz、MOR許容値0.025%、個々の周波数を20個欲しい。
つまり、500 Hz が中心周波数であり、MOR の許容誤差は 0.00025、WCM は 10(子周波数 20)です。
したがって、周波数間隔は、中心周波数500HzにMOR許容誤差0.00025を掛けたものとなります。
500 × 0.00025 = 0.125
そして、スペクトル%は、波サイクル倍数10に100を乗じ、周波数間隔0.125 Hzを500 Hzの中心周波数で割った値となります。
10 × 100 × 0.125 ÷ 500 = 0.25
それでは、周波数掃引スペクトルの例をここで見てみましょう。
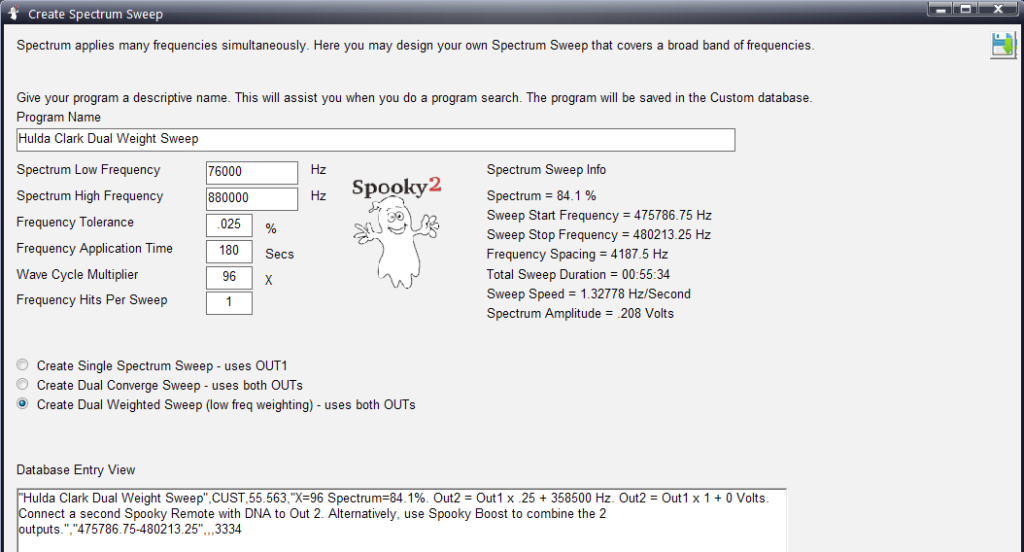
例 3: 76,000~880,000 Hz のハルダ・クラーク・レンジ周波数スイープを、MOR 許容誤差 0.025% で実行し、96 の個別の周波数を得たいとします。この例では、スペクトルスイープ作成ユーティリティを使用します。
ここでは、プログラム名を入力し、スペクトル低周波数を76000、スペクトル高周波数を880000に設定し、周波数許容誤差を0.025%に設定します(MOR許容誤差は周波数許容誤差と同じです)。また、波サイクル乗数を96に設定し、デュアルウェイトスイープタイプの作成を選択します。

右上の「保存」ボタンをクリックします。
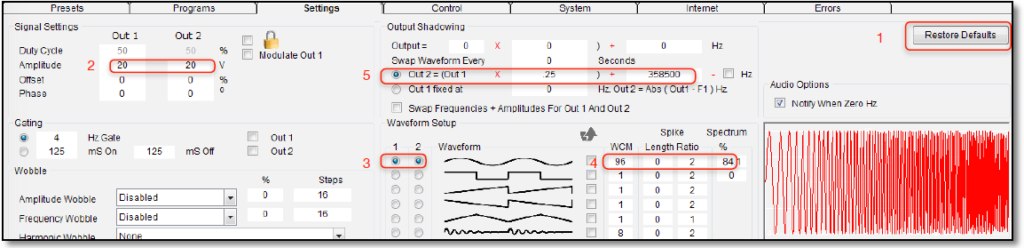
この掃引の設定は次のとおりです。
- 「デフォルトに戻す」をクリックします。
- 信号設定で、アウトプット1とアウトプット2の振幅を20に設定します。
- Waveform Setupで、Out 1の波形を正弦波、Out 2の波形を正弦波に設定します。
- データベース入力ビューの4番目のフィールドを使用して、WCMを96に設定し、波形セットアップでOut 1 Sine波形のSpectrumフィールドを84.1%に設定します。
- 出力シャドウイングの領域では、データベース入力ビューの4番目のフィールドを使用して、Out 2 = ( Out 1 × .25 ) + 358500 Hzの設定を行います。
波形を生成する
Spooky2は9種類の波形を生成します。以下に、それらの波形と、それらが何を行い得るかを示します。まず、加工されていない波形です。
正弦波:エネルギーが緩やかに上昇し、下降するヒーリングに有用。

矩形波:通常、病原体を殺すために使用され、ほぼ瞬時にフルパワーに上昇する。

ノコギリ波:出力が滑らかに上昇し、その後急激に低下する。治癒に有効。
逆ノコギリ波:強力な殺菌効果。ほぼ瞬時に出力が上昇する。
三角波:滑らかな一定のパワー上昇と下降。主に実験用。
減衰正弦波:1930年代にライ博士が使用。非常に強力。
減衰矩形波:世界初、ライフ博士の減衰正弦波からの推定
水爆正弦波:世界初、非常に強力な新しい正弦波。
水爆矩形波:世界初の矩形波バージョン。
Spooky2は、Waveform Setup(Follow Out 1、Spike+Sync、Inverse and Sync)で12種類の波形を提供しています(Follow Out 1、Spike+Sync、Inverse and Syncは、設定に応じてリアルタイムで作成される波形です)。その他の波形は、Custom Wavesメニューに用意されています。
次に、最初の周波数の3倍の2番目の周波数を追加することで生成される新しい波形を示します(F2コントロールについては、こちらで説明しています)。
正弦波:F1をF2に加算(F2=3xF1)。
矩形波:F1をF2に加算(F2=3xF1)。
ノコギリ波:F1をF2 に加算(F2=3xF1)。
逆ノコギリ波:F1をF2 に加算(F2=3xF1)。
三角波:F1をF2に加算(F2=3xF1)。
減衰正弦波:F1をF2 に加算(F2=3xF1)。
減衰矩形波:F1をF2に加算(F2=3xF1)。
水爆正弦波:F1をF2 に加算(F2=3xF1)。
水爆矩形波:F1をF2に加算(F2=3xF1)。
これは、最初の周波数の11倍の周波数を足した結果の波形です。(ホーランド11次高調波効果)
正弦波:F1をF2に加算(F2=11xF1)。

矩形波:F1をF2に加算(F2=11xF1)。
ノコギリ波:F1をF2に加算(F2=11xF1)。
逆ノコギリ波:F1をF2に加算(F2=11xF1)。
三角波:F1をF2に加算(F2=11xF1)。
減衰正弦波:F1をF2に加算(F2=11xF1)。
減衰矩形波:F1をF2に加算(F2=11xF1)。

水爆正弦波:F1をF2に加算(F2=11xF1)。
水爆矩形波:F1をF2に加算(F2=11xF1)。
両側波帯(DSB)振幅変調 — これは高調波と低調波を加えます。周波数2は最初の周波数の3倍です。
正弦波:F1を使用してF2を変調する(AM DSB、F2=3xF1)。
矩形波:F1を使用してF2を変調する(AM DSB、F2=3xF1)。
ノコギリ波:F1を使用してF2を変調する(AM DSB、F2=3xF1)。

逆ノコギリ波:F1を使用してF2を変調する(AM DSB、F2=3xF1)。
三角波:F1を使用してF2を変調する(AM DSB、F2=3xF1)。
減衰正弦波:F1を使用してF2を変調する(AM DSB、F2=3xF1)。
減衰矩形波:F1を使用してF2を変調する(AM DSB、F2=3xF1)。

水爆正弦波:F1を使用してF2を変調する(AM DSB、F2=3xF1)。

水爆矩形波:F1を使用してF2を変調する(AM DSB、F2=3xF1)。
DSB振幅変調を再び — 今回は周波数2が周波数1の11番目の高調波(DSB AMによるHolland効果)です。
正弦波: F1を使用してF2を変調する (AM DSB, F2=11xF1).
矩形波: F1を使用してF2を変調する (AM DSB, F2=11xF1).

ノコギリ波: F1を使用してF2を変調する (AM DSB, F2=11xF1).
逆ノコギリ波: F1を使用してF2を変調する (AM DSB, F2=11xF1).
三角波: F1を使用してF2を変調する (AM DSB, F2=11xF1).
減衰正弦波: F1を使用してF2を変調する (AM DSB, F2=11xF1).
減衰矩形波: F1を使用してF2を変調する (AM DSB, F2=11xF1).
水爆正弦波: F1を使用してF2を変調する (AM DSB, F2=11xF1).
水爆矩形波: F1を使用してF2を変調する (AM DSB, F2=11xF1).
単側波帯(SSB)AMは強力な高調波を生じます。周波数1は周波数2の第3高調波と乗算されます:
正弦波: F1を使用してF2を変調する (AM SSB, F2=3xF1).
矩形波:F1を使用してF2を変調する(AM SSB, F2=3xF1).
ノコギリ波: F1を使用してF2を変調する(AM SSB, F2=3xF1).
逆ノコギリ波: F1を使用してF2を変調する (AM SSB, F2=3xF1).
三角波: F1を使用してF2を変調する(AM SSB, F2=3xF1).

減衰正弦波: F1を使用してF2を変調する (AM SSB, F2=3xF1).
減衰矩形波: F1を使用してF2を変調する (AM SSB, F2=3xF1).
水爆正弦波: F1を使用してF2を変調する (AM SSB, F2=3xF1).
水爆矩形波: F1を使用してF2を変調する (AM SSB, F2=3xF1).
最後に、SSB AM方式を再度説明します。周波数2に周波数1の第11高調波を乗算した波形となります(SSB AMによるホランド効果)。

正弦波: F1を使用してF2を変調する(AM SSB, F2=11xF1).
矩形波:F1を使用してF2を変調する (AM SSB, F2=11xF1).
三角波: F1を使用してF2を変調する(AM SSB, F2=11xF1).
逆ノコギリ波: F1を使用してF2を変調する (AM SSB, F2=11xF1).
三角波: F1を使用してF2を変調する(AM SSB, F2=11xF1).
減衰正弦波: F1を使用してF2を変調する (AM SSB, F2=11xF1).
減衰矩形波: F1を使用してF2を変調する (AM SSB, F2=11xF1).

水爆正弦波: F1を使用してF2を変調する (AM SSB, F2=11xF1).
水爆矩形波: F1を使用してF2を変調する (AM SSB, F2=11xF1).
波形についてさらに詳しく:
正弦波:正弦波の振幅がなす穏やかな曲線は、癒しに適しています。その軌跡はエネルギー/運動の最も純粋な形態であり、自然界の至る所でその形を見ることができます。高周波数に最適であり、そこでは効率的に除去することも可能です。
矩形波:振幅の急激な上昇と下降、そして長い山と谷が特徴であり、この波形は病原体の殺菌に非常に適しています。ただし、特に低周波数を使用する場合、治療効果も期待できます。
ノコギリ波: これまで、この波形はライフ療法において実績がなかったので、依然として主に実験段階と見なされています。しかしながら、これまでの実験では、治療に非常に効果的な波形であることが示されています。
逆ノコギリ波: ピークレベルへの急激な上昇と振幅の直線的な減少が組み合わさったこの波形は、生物の殺傷に極めて優れており、矩形波よりも効果的に作用します。高振幅/高電圧では治療には適しませんが、出力を抑えて使用した場合に良好な結果を得たという報告もあります。
三角波:ライフ装置における実績がなく、依然として実験段階です。直線的な傾斜のため「鞭打ち効果」は低くなりますが、正弦波のより直線的な代替波形として有用な可能性があります。
減衰正弦波:スミソニアン研究所の記録にも残る、ライフ博士の著名ながん殺傷波形です。スパイクを豊富に散りばめると、恐るべき武器となります。しかし漸減する正弦波を基盤としているため、(スパイクなしでは)治療用途にも極めて優れています。
減衰矩形波:矩形波に減衰処理を施した、Spooky2独自の全く新しい波形です。そのエネルギーの軌跡は病原体に対して致死的であり、現在、治療用途においても成功裏に試験が進められています。
水爆正弦波:ジョンによって設計され、立ち上がり/立ち下がりエッジにエネルギースパイクを持ちます。正弦波を基にしているため、強力な治療用途に適していると考えられます。また、病原体殺傷用途としても有用であるはずです。
水爆矩形波:一部の方からは、Spooky2最強の殺傷装置との評価もいただいております。ジョン氏は遠隔使用には強力すぎる可能性を懸念されておりますが、多くのユーザーがヘルキシングを伴わずに遠隔治療で成功を収めております。
ナノガイドA:その他の用途
かつてSpooky2チームのメンバーであった方が、非常に高価な最高級商業用ライフマシンを三台所有していました。その総額は小型車一台分に相当するものでした。最も高価な一台は故障が頻発したため、一部返金を受け取りながら返品されました。二つ目は箱から出した瞬間から全く作動しませんでした。三つ目は問題なく動作し、頑丈な造りであったため、(文字通り)命に関わるほど重要な機械に求められる第一の条件——信頼性——を満たしていました。
しかしながら、彼は安価で手軽なSpooky2を選択しています。なぜなら、これがお金で買える中で最も強力で効果的、かつ多機能なライフマシンであると信じているからです。ごくわずかな費用で手に入ります。しかしSpooky2は単なるライフマシンではありません。現在では、以下のことも可能です:
- 優れたナノコロイド/イオン銀を製造する。
- 強力なクラーク・ザッパーとして機能し、スペクトラム・ザッピングが追加特典として付随する。
- 足湯として非常に効果的に使用できるライフシステム(設定済みで説明書付き)。
- 家庭内の害虫やカビを根絶する。
- 不気味なコールドレーザーリストバンドまたはツインを起動する。
- PEMFコイルを駆動する。
コロイダルシルバー
かつては常識とされていた事実が、今では忘れ去られています。ほぼ100年にわたる絶え間ない宣伝と虚偽によって、人々は薬こそが病気と戦う最良の方法だと信じ込まされてきました。嘘も繰り返せば真実になるのです。なぜでしょうか?あらゆる社会を支配する最も効果的な方法は、その構成員の健康を鉄の支配で掌握し、維持することにあります。病める者は、ほとんど抵抗できません。
変化の時が来ました。 Spookyは誰もが自身の健康を管理できるようになることを願っています。 すべては教育から始まります。 そして真実から。
お金が健康問題を左右するようになる以前には、安価な治療法が効果を発揮していました。古代ローマ人は切り傷の感染を防ぐために純粋な蜂蜜を使用していました。ゴボウ(一般的なアザミの一種)は、がん、糖尿病、エイズなどの慢性疾患の治療に用いられてきました。これは血液浄化作用があり、湿疹、にきび、乾癬などの皮膚トラブルの治療に直接皮膚に塗布することも可能です。
雑草からは利益を得られないため、薬が開発されました。薬の危険性を軽微に見せるため、「副作用」という用語が考案されました。正しい表現は「望ましくない効果」であるべきです。米国農務省化学局(後にFDAに改称)は、長年実績のある治療法の多くについてその有効性に疑問を呈しました。ついに、ほとんどの自然療法を違法とする大きな動きが起こったのです。
冷蔵技術が普及する以前、人々は牛乳瓶に銀貨を投入し、牛乳の鮮度を長く保っていました。銀製のカトラリーは、今も昔も細菌対策に用いられてきました。銀にはウイルス、細菌、真菌類を殺す驚くべき能力があるのです。カリフォルニア大学ロサンゼルス校医学部産婦人科部長のラリー・C・フォード医学博士による独立試験では、コロイダルシルバーが650種以上の細菌、真菌、寄生虫、カビ、および病原性を有する可能性のある全ての微生物を死滅させることが確認されました。
銀は薬品の販売にとって脅威となるため、その安全性に対して疑念を抱かせる必要がありました。誤って製造されたイオン銀を大量に飲用した二人の事例が広く報じられました。彼らの皮膚は青変していました。これらの報道では、パラセタモールなどの一般的な薬品の危険性が省かれていました。パラセタモールは、ほんの数錠多く服用するだけで深刻な肝臓障害を引き起こす可能性があります。この薬は処方箋なしでどのスーパーマーケットでも購入できます。
2009年、米国疾病予防管理センター(CDC)——保守的(そして現在では信頼できないと指摘されることもある)機関として知られる同センターが発表した報告書によりますと、処方薬による死亡者数は37,485名に上り、これは道路交通事故による死亡者数36,284名を上回る数値でした。多くの人々が無害と信じている一般的な医薬品による死亡者数は、その年におけるヘロインとコカインによる死亡者数の合計を上回ったのです。
一方、銀は安全かつ効果的です。2000年以上にわたり、病気の予防や治療に用いられてきました。私たちの身体は正常に機能するために銀を必要としています。
コロイダルシルバーとイオン化銀の違いを理解することは重要です。
コロイダルシルバーとは、液体中に微細な銀粒子が分散したものです。これらの粒子は安定しており、外用(皮膚)と内服の両方に適しています。銀溶液の中で最も望ましい形態です。Spooky2装置は真のコロイダルシルバーを生成することが可能です。
イオン性銀とは、液体中に溶解した銀原子のことです。その原子サイズはコロイド銀粒子よりもはるかに小さいものです。各原子は電子を一つ欠いているため、非常に反応性が高くなっています。イオン性銀は体内の塩分と接触すると望ましくない塩化銀へと変化するため、外用(皮膚)のみに適している可能性があります。
マーケティング上の誇大宣伝により混乱が生じています。現在販売・製造されている「コロイダルシルバー」のほとんどは、実際には90%以上がイオン性銀であり、これは外用のみに適しています。体内に入ると効果を発揮しません。イオン性銀の粒子サイズは1分子です。
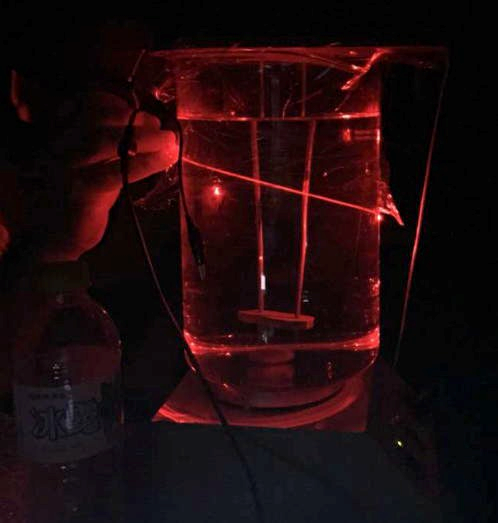
コロイダルシルバーとイオン性銀には目に見える違いがあります。こちらのコップには、それぞれ銀濃度が約15ppmの異なるバッチの銀溶液が入っています。左側のコップは、昔ながらの直流(電池)方式で製造されました。イオン含有量が高く、無色透明です。しかし塩を加えると、銀イオンが塩化銀に変化するため白濁します。右側のグラスはコロイド含有量が高く、黄金色を帯びています。塩を加えても透明度は変わりません。これは非常に弱い電流と特殊なSpooky2波形を用いて2日かけて生成されました。

手順
次の数ページに記載されている簡単な手順に従い、高銀含有量の真のナノ粒子コロイダルシルバーを作ります。
銀粒子の粒径は非常に小さくなります。これにより効果が向上します。
1. ガラスまたは陶器の容器に蒸留水を入れます。水道水やろ過水は使用しないでください。これらはほぼ確実に不要な不純物や化学物質を含んでいます。
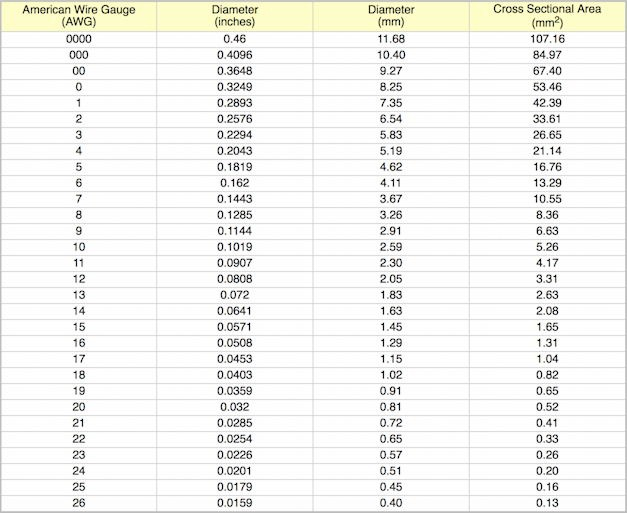
2. 清潔で光沢のある銀の棒を2本、水中に設置してください。棒同士の間隔は1インチ以上空け、太さは14AWG以上である必要があります。表面積が大きくなるため、9AWGが理想的です。
これにより微細な粒子となり、さらに強度が増すという利点があります。
ロッドは少なくとも99.99%の純度の銀でなければなりません。
銀の棒を見つける:Startpageの検索リスト。
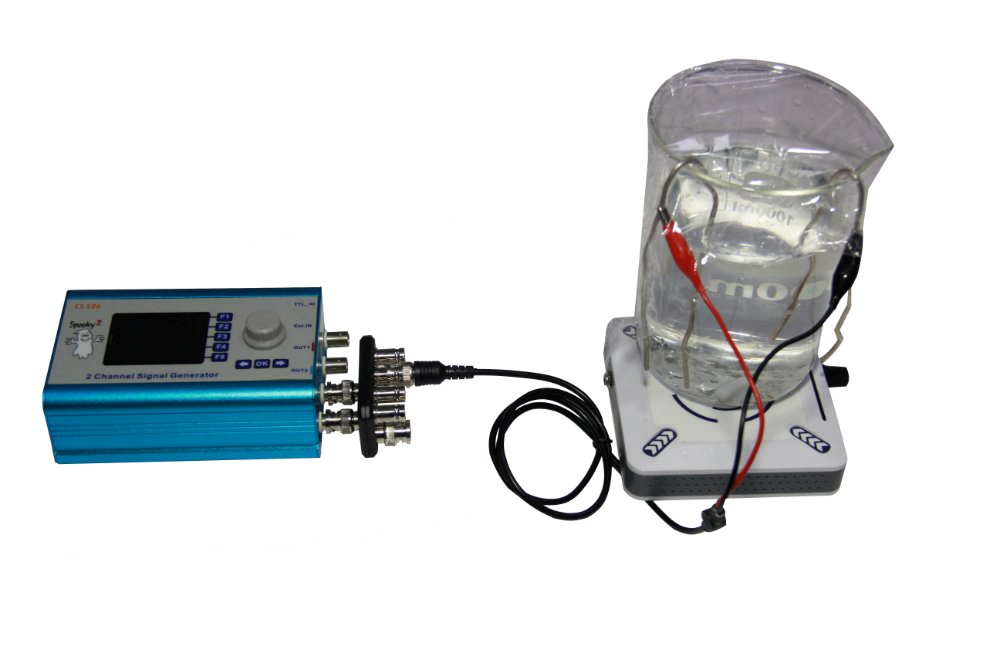
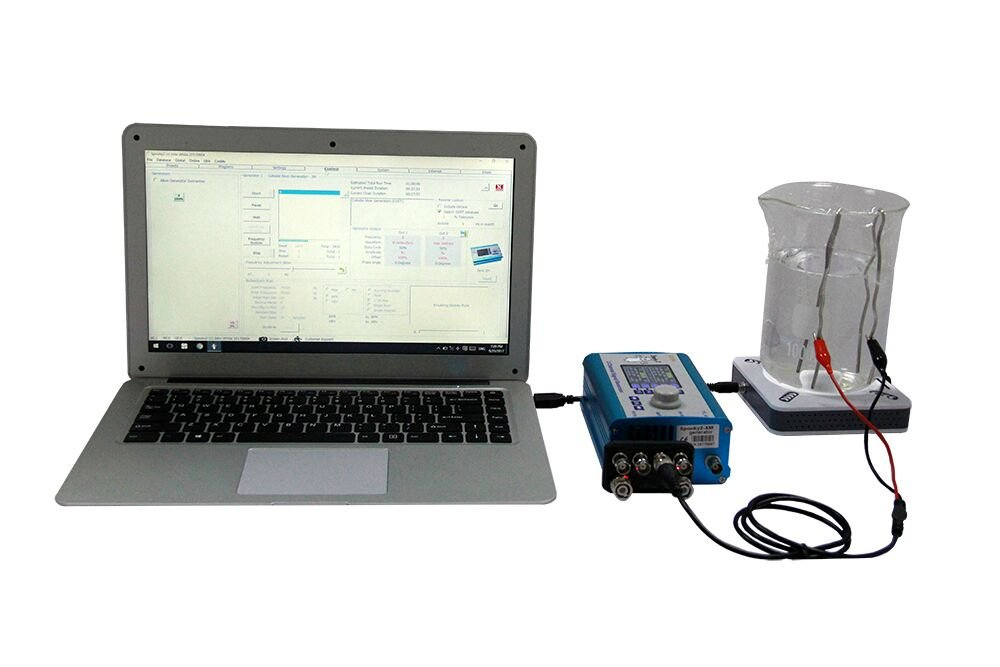
3. Spooky2-XM ジェネレーターの出力チャンネルを、それぞれのロッドに接続してください。
接続には、Spooky Boost シグナルプロセッサーを使用するか、または個別のBNC-ワニ口クリップケーブル2本の赤色クリップをご利用いただけます。
Spooky2 シルバーキット(左図)には、Spooky Boost および純度99.99%の銀製ロッド2本が同梱されております。こちらからお求めいただけます。
4. Spooky2を起動し、Calculator(下)を使用してColloidal Silver Generation–JWプリセットに必要な滞留時間(Dwell)を推定してください。場合によっては、ステップ5に進み、ジェネレーターを短時間作動させて電流(mA)をマルチメーターで測定し、その値を計算機に入力する必要があるかもしれません。
By Calculationペインの6つのフィールドは相互に関連しています。いずれかの値を変更すると、他のフィールドの値も連動して変化します。上段の3つのフィールドに数値を入力することで、Optionsペインに入力すべきDwell Multiplierを算出できます。
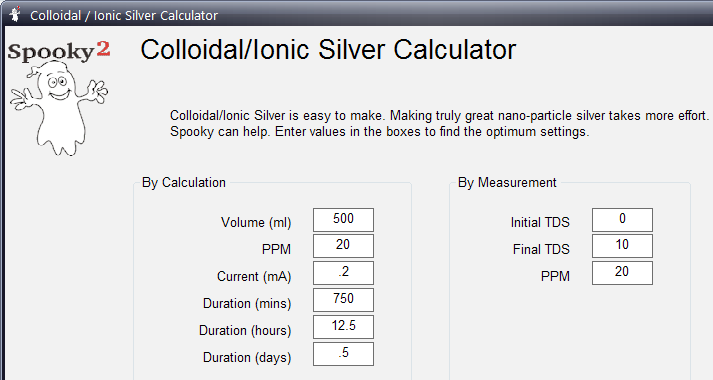
あなたのCSを作成するのに必要な総時間が表示されます。By Measurementパネルでは、作業開始前に蒸留水の初期TDS値を入力し、その後、最終製品(または製造途中)の最終TDS値を入力してください。推定PPM値が下に表示されます。あるいは、目標TDS値を得るためにPPM値を入力することも可能です。
5. Colloidal Silver Generation–JWプリセットを読み込みます。推定滞留時間をDwell Multiplier(滞留時間乗数)フィールドに入力し、ジェネレーターを起動してください。この波形は、さまざまなサイズの非常に微細な銀粒子を生成するよう設計されています。製造工程を急がないでください。ゆっくり行うほど良い結果が得られます。ご成功をお祈 りします。
重要事項
- コロイダルシルバーの品質は、ゆっくりと時間をかけて行うことで向上します。真に優れた銀溶液を調製するには、1日以上かかる場合もございます。
- 冷水をご使用ください。お湯を使用するとプロセスは速まりますが、粒子が大きくなる傾向がございます。
- 銀粒子が均一に分散するよう、1時間ごとに水をかき混ぜてください。
- 完成した溶液は剥離した酸化銀により白濁しています。沈殿物が容器底に沈むよう、1時間静置してから上澄みを取り分けてください。
- 使用可能なCS溶液は淡黄色~黄金色を呈します。これは粒子サイズが非常に小さいことを示しています。溶液中にレーザー光を照射すると、赤い線が視認できます。これは懸濁状態の微細な銀粒子を示しています。
- CS溶液は暗色のガラス容器で保管してください。プラスチック容器や太陽光に含まれる紫外線は、銀イオンの正電荷を消失させ凝集を引き起こす可能性があり、その結果、治癒能力が失われる恐れがあります。
Spooky CSプロトコルが特別な理由は何でしょうか?
3つの独自の特徴により、Spooky2は驚くほど高品質なコロイダルシルバーを生成します。
1. 三角波形状の波形は、振幅が変化する直流パルスを利用します。この振幅によって、銀棒から引き出される銀粒子のサイズが決まります。引き出される粒子はそれぞれナノメートル単位のサイズで、異なる大きさの粒子が生成されます。
2. この波形には10%の直流オフセットが加えられており、製造時間の短縮につながります。
3. 銀棒は洗浄の必要がありません。 スワップ波形反転により、陽極(+)に蓄積した水酸化銀がめっき銀へと変化し、容器の底に沈殿します。これにより、銀溶液の汚染を防ぐことができます。
JWによる優れたコロイダルシルバーの製造について
“コロイダルシルバーの濃度を正確に測定することは困難です。多くの方はTDSメーターを使用されますが、コロイド銀は溶液中に分散した銀粒子であり、溶解しているのは銀イオンのみです。そのため、TDSメーターではイオン状の銀の濃度のみを測定でき、コロイド銀の濃度は測定できません。
“TDSメーターは水の導電率を測定し、オーム単位をppm単位に変換します。
“Spooky2が生成するコロイド銀は、コロイド銀のイオン化銀に対する比率が非常に高い特性を持っています。計算機は、初期のTDS測定値(蒸留水のみを対象とし、この値は1以下であるべきです)と、その後の最終的なTDS測定値を比較します。
“測定値の差異から、Spooky2は溶液中に存在する銀の真の含有量(ppm、すなわち百万分率)を判定します。
“ppmをより正確に測定する方法としては、ミリアンペアに設定したマルチメーターを使用することが挙げられます。
“作業を開始する前に、すべての準備を整え、任意の滞留時間乗数を設定したプログラムを実行してください。マルチメータを直列に接続し、ロッドの一つを流れる電流を測定します。
“これは、銀棒のいずれか一つに接続されているクリップを外し、それをマルチメータのリード線の一つに取り付けることを意味します。もう一方のマルチメータのリード線が、クリップを外した銀棒に触れると、電流が表示されます。この電流値と水の体積を計算機に入力することで、CSを生成するのに必要な時間の良い推定値が得られます。
“溶液を流れる電流は、棒からより多くの銀が剥離するにつれて時間とともに増加します。10kオームの抵抗器の目的は、電流をより一定かつ低い状態に保つことです。
“この文章を入力している間も、私はCSを製造中です。プログラムは191,519秒間稼働しており、電流は0.21mAから0.3mAに増加しました。4リットルの素晴らしいCSを製造するには、合計360,000秒、つまり4日強を要します。待つことに全く問題はありません。この作業は私の設備に組み込まれており、CS生産専用に割り当てられた発電機1基は、本当に迷う余地のない選択です。
“前ページには昨夜撮影した写真が掲載されており、現在のバッチの品質が確認できます。なお、これは製造工程の途中段階に過ぎません。レーザービームは後ほどさらに明るくなります。イオン化銀には光を反射する懸濁状態の銀固体がないため、ビームは発生しません。銀イオンは溶解するからです。
“使用方法につきましては、銀を飲み込むことはしません。口の中で2分間すすいだ後、吐き出します。うがいにも使えます。銀の粒子は細胞に直接入り込むほど十分に小さいのです。
“銀の棒は全く洗浄していませんし、洗浄の必要もありません。
“そして、一時間ごとに目を覚まして溶液をかき混ぜる必要はありません!磁気攪拌機をご使用ください。お伝えすることを忘れていましたが、私はこれを約4回転/分で設定して使用しています。
“上記はセットアップ全体の写真です。
クラーク・ザッパー
Spooky2が登場する以前、ライフ療法を試す余裕があったのは経済的に余裕のある方のみでした。経済的に余裕がなければ、ザッパーが唯一の選択肢でした。
素晴らしい人道的なハルダ・クラーク博士によって考案されたこの装置は、広く入手可能な安価な電子部品を用いて家庭で製作するための設計図と手順書が、無料で提供されました。
つまり、Spooky2は素晴らしい仲間たちと共に名を連ねているのです。
あの頃から、電気ショック装置を中心に全く新しい産業が生まれました。非常に優れた製品もあれば、あまり良くない製品もあります。そして、ほぼ全ての製品がSpooky2装置よりも高価です。
最も基本的な構造において、オリジナルのクラーク式ザッパーは単一の周波数——30,000Hz——を使用していました。そして、照射した対象は全て死滅しました。では、たった一つの周波数が、どうしてこのような効果を発揮できるのでしょうか?
その答えは、クラーク博士が選択した設定にあります。彼女の装置は電池駆動である必要があったため、振幅は9ボルトに制限されていました。また、可能な限り多くの奇数次高調波(高調波と低調波の両方)を得るために、矩形波を選択したのです。
彼女の真の卓越性は、100%の正のオフセットを指定した点にあります。このような矩形波を駆動することで、0HzからMHz帯域に至るまで、60,000Hz間隔で配置された膨大な高調波周波数群を発生させることができるからです。
その後、別のザッパー周波数である2,500Hzが開発されました。同じ設定で使用した場合、この周波数では5,000Hz間隔で広がる倍音が生成されます。多くのザッパーユーザーは、この低い周波数が中空器官や体腔内の問題に対してより効果的であると考えています。
両方のバージョンが現在Spooky2データベースに追加されています。また、2つの出力端子を使用して両方の周波数を同時に送信するデュアルバージョンも追加されました。
しかし、それだけで終わらせる必要はありません。遠隔使用向けの第二バージョンにはスペクトラムも組み込まれており、病原体や寄生虫にとってまさに周波数の地獄のような環境を作り出します。
ザッピングは依然としてコンタクトモードで行うのが最も効果的ですが、パンカジ・ミシュラ博士がプログラムタブに非常に有用なリモートモードプログラムを提供してくださっています。
コンタクトモードのザッパープログラムは、1回につき7分間のみ実行してください。再度ザッピングを行う前には、21分間の休憩が必要です。この休憩時間は、体が浄化処理に対応できるよう整えるために必要です。デトックスプログラムを実行することで、さらにサポートすることも可能です。休憩を取らずにコンタクトモードで7分以上ザッピングを続けると、火傷を負う恐れがあります。
ザッピングを試したことがない方は、ぜひお試しください。非常に効果的です。そして、サナダムシを安全に駆除する最良の方法であり続けています。
害虫およびカビ
元スプーキーチームのメンバーによる、Spooky2とスペクトラムスイープを用いた非公式な環境実験は、非常に驚くべき結果をもたらしました。
すべては2013年の夏の終わりに始まりました。天然木の床とタイル張りの床に黒カビが発生したのです。以前の住まいは暖かく乾燥していたため、この発見には驚かされました。
カビはベタベタしていて、掃くことも掃除機をかけることもできませんでした。どちらの方法もそもそも良くない方法でした。そのため、対処する唯一の方法は、四つん這いになって手でこすり落とし、その後、非常に慎重に少しずつ小さな範囲を掃除していくことでした。
脊髄に障害があるため、これは到底無理な話でした。そのため、別の解決策を見つけなければなりませんでした。
彼はカビのサンプルを採取し、テープに包んで、当時使用していた旧式のUDB1108S発生装置に取り付けた手作りのDNAホルダーに挿入しました。その後、CAFL Fungus and Moldセットを無限ループで実行しました。
一ヶ月から六週間ほどかかりましたが、やがてその黒いカビは灰色に変わり、彼はそれが死んだことを意味すると考えました。
数週間後、トビムシに悩まされているという方から、彼の「妄想昆虫」ウェブサイト宛てに手紙が届きました。 彼女はスプーキーは持っていなかったものの、市販のライフマシンを所有していました。そこで彼は、遠隔操作の設定方法、遠隔伝送用のDNAサンプルとして死んだ昆虫を使用する方法、そして別の情報提供者から報告されたトビムシを体外に追い出す周波数セットを送信する方法を彼女に伝えました。
効果はありました——彼女の家からは
トビムシが一掃されたのです。
Spooky Spectrum Sweepの発表直後、ある朝、使用していない寝室に大きな黒蟻が大量に出現していることに気づきました。約50~60匹の蟻が、すべて床下から這い上がってきたのです。
そこで彼は同じ仕掛けを試しにやってみることにしました。一匹を殺し、紙テープの包みに入れ、その後「Spooky Spectrum Sweep」を休まずに作動させ続けたのです。
その数はほぼ即座に劇的に減少しました。そして、1週間以内にすべてなくなりました。
また、新鮮な有機野菜にカビが非常に早く発生していることに気づきました。そこで、彼は別の二種類——青カビと白カビ——でも同じ実験を行いました。
野菜や果物にもカビは全く生えなくなりました!
別の出来事は、台所に大群の赤アリが現れた件でした。デュアルリモートのSpooky2-XMが2体の死骸に対してConverge Sweepを実行したところ、3日で全ていなくなりました。
その後、彼は別の種によるアリの侵入を再び経験しました。今回もSpooky2を使用して対処したところ、今度はわずか5分以内に台所から全てのアリが姿を消しました。それ以来、彼の台所ではさらに3回のアリの侵入が発生しましたが、Spooky2は毎回1時間以内に全ての不快な侵入者を駆除しました。
彼らは彼の庭から侵入してきており、彼はそこで彼らが邪魔されずに暮らすことは大いに歓迎すると言っていました。しかし、彼は私の住処を彼らと共有することを望んでいませんでした。
彼は浴室に発生した厄介な排水管ハエの駆除にも成功しました。30日間駆除作業を継続した結果、1日あたり30~50匹いた不快な訪問者の数がゼロにまで減少しました。
この特定の侵入事例においては、他の昆虫と比較して時間がかかっていることから、おそらく複数の遺伝子プールが関与していたと考えられます。
とはいえ、排水口ハエはもういません。
それはどのように機能しているのでしょうか?
さて、私たち人間と同様に、昆虫の腸内にも食物の消化を助ける細菌や真菌の共生生物が存在します。この殺虫剤はそれらを瞬時に死滅させ、害虫は豊富な食物に囲まれながらも突然餓死してしまうのです。
さて、私たち人間と同様に、昆虫の腸内にも食物の消化を助ける細菌や真菌の共生生物が存在します。 スイープはこれらを瞬時に死滅させ、害虫は豊富な食物に囲まれながらも、突然飢え死にすることになります。
彼はこの事実を興味深く思いました。なぜなら、特定の周波数セットが存在する昆虫は、環境下で駆除できることを意味するからです。データベースに鳥ダニ用の周波数が登録されていることから、この厄介な害虫に個人としても環境的にも悩まされている方々にとって、これは朗報と言えるでしょう。
それは、家の中の成虫が、幼虫が羽化するのと同じタイミングで死亡することを意味しています。
また、ダニ(Dermatophagoides)に対する周波数も備えているため、喘息やアレルギーをお持ちの方にも朗報です。家庭内のダニを迅速に駆除する無毒の方法となるからです。お掃除の時に集めたゴミを数点、リモートに置くだけで効果を発揮します。
残念ながら、Spooky2では園芸上の問題をお役に立てる可能性は低いと思われます。屋外での害虫被害は、様々な遺伝子プールに属する昆虫が関与している可能性が非常に高く、そのため伝播媒介昆虫と遺伝的に関連する個体のみが影響を受けることになります。
虫やカビの繁殖でお困りの場合は、ぜひお試しいただき、その結果をお知らせください。
当社のユーザー様2名がまさにその方法を採用され、その成功事例を共有することを許可してくださいました。一つ目は、ユーザー様の友人のご自宅にある美術品に発生していた甲虫に関する事例です。二つ目は、ユーザー様ご自宅の地下室に発生し、ご家族の皆様に深刻な体調不良を引き起こしていた危険な黒カビに関する事例です。

こちらが彫刻作品です。左側の曲がった脚をよくご覧いただくと、甲虫が食い荒らした跡の穴が確認できます。黒い台座の上には、死んだ甲虫が数匹見受けられます。 クリアランスを始めて間もない頃は、スイープの設定が完全には整っておらず、進捗は遅々としておりました。しかしながら、
設定が修正された際には、さらに多くの甲虫が死に追いやられました:
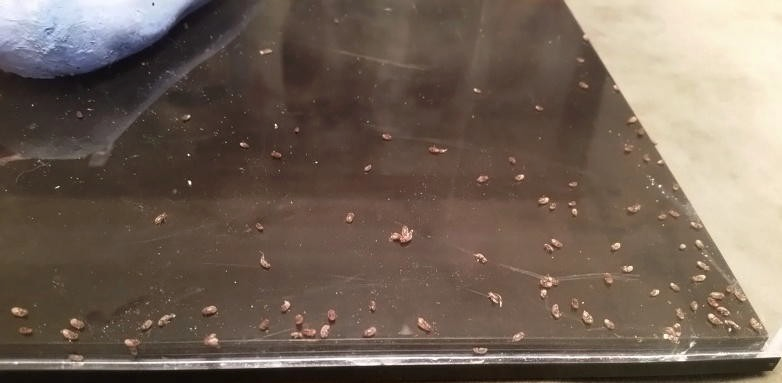
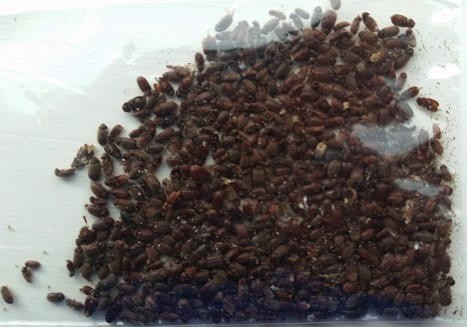
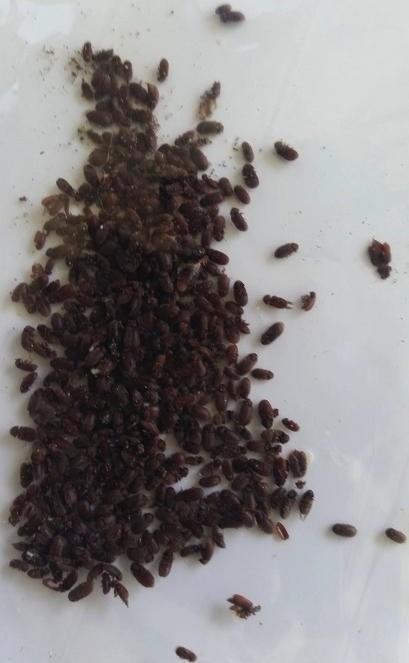
ご本人の言葉によりますと:「過去10年間、およそ半年ごとに20~30匹の甲虫が彫刻から出てきました。彼らは数日間、囲いの中を這い回り、やがて死んでいました。Spooky Spectrum Sweepを使用するまでは、一度に数匹以上出たことはありませんでした。しかし、数匹の死骸をSpooky Remoteに置き、スキャンを実行すると、ほぼ毎日甲虫が出てきたのです。」
この作業には三か月を要しました。このような大規模な発生は、膨大な数の卵が産み付けられていたことを意味します。 スイープはエサを摂っている成虫のみを駆除でき、卵には効果がありません。そのため卵は孵化し続けました。しかし、5月の最終週には、わずかな甲虫しか出現しませんでした。さらにこの女性は、自宅に侵入していた蟻を駆除した別の成功事例も報告しています。
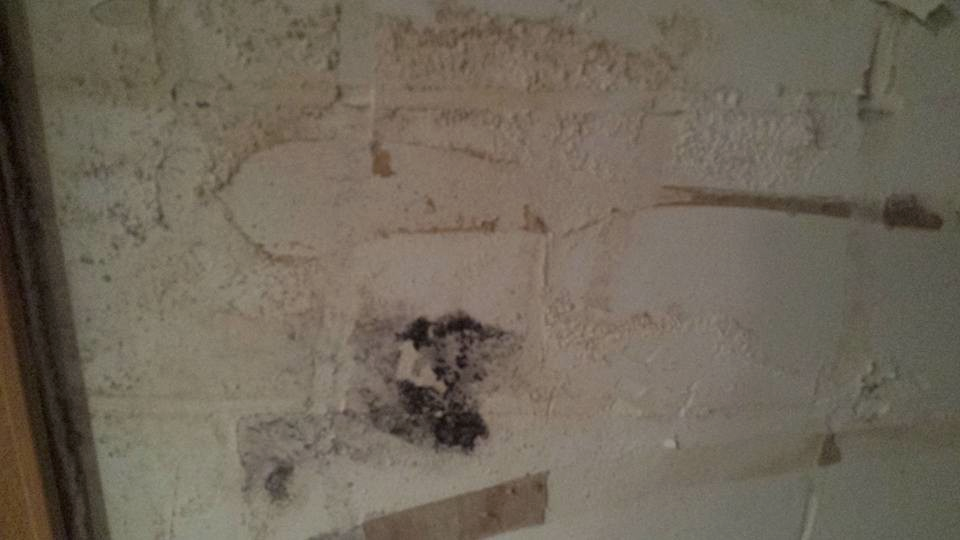
彼女は次のように記しています:「この壁全体(8フィート×40フィート)がほぼ全て黒カビに覆われていました。これが残った部分です。直径約8インチの円形です。かつてカビが生えていた隆起部分がおわかりいただけるかと思います…」
納屋へ通じる水道管が、仕上げ済みの地下室の壁の裏側で漏水していることを発見した際、深刻な問題が発生いたしました。石膏ボードを撤去したところ、その状況は恐ろしいものでした。石膏ボードの撤去が完了したその日、Spooky2ジェネレーターが到着し、サンプルを用いたリモートキリングを直ちに開始しました。
「二つのカビのサンプルにつきましては…一つは黒カビで、今朝確認したところ、現在は灰色に変化しています。もう一つは同じ場所から採取した緑色のカビで…
昨夜、地下室のカビの状態を確認しに行きました。すると、約99%が白い粉状に変化していることに気づきました。緑色や黒色のカビはほぼ消えかけています!本当に嬉しいです!
検査を終えて戻り、夫に話そうとした途端、涙が止まらなくなってしまいました…本当に疲れ果てていました。この悪夢のような日々も、もうすぐ終わりです。ここ数年、体調が非常に悪く、何度か死が近いと思ったこともありました。本当に、本当に嬉しいです!Spooky2ありがとう!
なお、写真内の黒い部分(他の部分よりも除去に時間がかかった箇所)も、現在は完全に除去されております。
これらの二つの体験談は、Spooky2をご利用いただいているお客様から寄せられた数多くの声の一部です。また、結果の写真が撮影され、その後当社に共有された事例としては、現時点で当社が把握している限りではこの二件のみとなります。
実際にご覧いただくことが何よりの証明となりますので、皆様にもお見せいたします。
害虫およびカビ対策用に開発されたプリセットは全て、Environmentalフォルダに入っています。
ナノガイドB:宇宙
Spooky2を最大限に活用したいとお考えでしたら、非常に基本的なこと——エネルギーについて理解することが不可欠です。そしてそのためには、現実や宇宙の本質に関する現在の信念を完全に捨て去る覚悟が必要です。
物事は見た目とは異なるからです。
今この瞬間、あなたは自分が生きている世界が確固たるものであると信じていらっしゃるでしょう。確かにそのように見えます――もしコーヒーテーブルにぶつかったら、すねを痛めて痛みに耐えながら部屋中を跳ね回るでしょう。コーヒーテーブルは物質であり、あなた自身もまた物質なのです。
では、物質とは何でしょうか?
物質は分子から構成されています。そして分子は元素原子から構成されています。それらの元素原子の性質と、それらが結合する方式によって、扱う物質の種類が決まります。
原子の違いと分子の違いについて、図で説明します。

上段の球体は、酸素、炭素、水素の単一原子です。単一原子は元素と呼ばれます。
Below them are simple molecules that are made up from those atoms: O2 is the type of oxygen we need to breathe, and it’s made from two single oxygen atoms.
Next is carbon dioxide, which we exhale. That’s made from two atoms of oxygen that have bonded with one atom of carbon.
The final molecule is water, made from two atoms of hydrogen and one atom of oxygen.
These are all very simple molecules. Two are gases, and the third is a liquid. Now we’ll look at a more complex molecule.
This is a molecule of heroin. It’s made from atoms of carbon, hydrogen, nitrogen, and oxygen.
The solid links between the atoms in the illustration don’t actually exist — they’re simply used in models of molecules to show how each atom is bound to its neighbors.
This method of modeling is called stick-and-ball.
As molecules go, heroin is fairly straightforward. But there are a great many others that are far more complex than this.
When you look at this molecule, you can see that it actually consists of one other thing besides its constituent atoms.
Empty space.
In fact, it’s more empty space than it is atoms.
Yet heroin isn’t a gas, and it isn’t a liquid — it’s a solid. A solid that’s mostly made up of empty space.
OK, but it’s still got a whole bunch of atoms in there, and they must be what give heroin its apparent solidity. So let’s examine a single atom and see what it’s made from.
We’ll pick carbon, since diamonds are made from this, and they’re one of the hardest and most solid things on Earth.
The nucleus in the center is composed of neutrons and protons that are tightly packed together. The rest of our carbon atom is six electrons, all orbiting the nucleus very rapidly.
Every type of elemental atom has a different number of protons, neutrons, and orbiting electrons.
You’ll notice that protons all have a positive electrical charge, and electrons all have a negative charge. Neutrons, as their name suggests, carry no electrical charge, and are neutral.
But, just like a molecule, an atom is once again mostly empty space.
And when you start to probe even deeper into the structure of neutrons, protons, and electrons, you find that they’re composed of even smaller sub-atomic particles. Interesting, but not terribly exciting so far.
Now let us show you something that may shock you.
Let’s gather together every single molecule that exists in the observable universe. We’ll split all those molecules into their constituent atoms, removing all the empty space.
Now we’ll make a necklace of all those single atoms end to end. How long do you think that necklace would be?
It would be the same length as the Earth’s orbit around the Sun — 600 million miles.
If you think that’s amazing, let’s go further now and remove the empty space in all those atoms, so we’re only left with real solid material. And then we’ll roll all these solid leftovers up into a ball.
How big do you think that ball would be?
Get ready for this: all the atoms in the observable universe, with all their empty space removed and compressed into a single ball, would be the size of one single PEA.
Solid matter is an illusion.
Matter is energy. And energy is movement from one state to another and back again. This movement of energy is called vibration, or oscillation. And it’s the mind-boggling speed at which this oscillation occurs that gives energy its appearance of solidity.
Think of a propeller on an airplane. When it’s stopped, it’s two or three distinct single blades. When it’s moving, it looks like a semi-solid disc. If you could build an engine that was capable of turning the propeller faster than the speed of light, the semi-solid disc of the propeller would become solid, and you could reach out and touch it without harm.
At this speed, linear time breaks down, and the individual blades are now in all their possible positions at the exact same instant. In other words, what were originally positions in time have now become positions in space.
So now we’ve identified three interrelated aspects of energy that relate to its manifestation as matter, and they’re not just the building blocks of the universe we’re all part of, they’re also the foundation stones of Rife therapy.
They are speed, space, and time, and we’ll look at them in the next section.
And we’ll see how the combinations of these three variables explain the infinite multiplicity we experience all around us.
Speed, Space & Time
Speed is a function of space and time. When you take a leisurely stroll, you’re moving through five miles of space in one hour of time — 5mph. When light takes a stroll, it moves through almost 671 million miles of space in one hour of time — 670,616,629mph.
When something vibrates, or oscillates, it’s energy moving through space and time. The difference is that the distance through space is almost infinitesimally small, and the time taken for the journey varies with whatever’s doing the vibrating. Another difference is that vibration is always a journey from A to Z and back again — it’s never in one single direction.
To simplify things, let’s call this journey from A to Z and back again a “state change.” Where energy is concerned, this state change is from positive to negative and back again, and as energy undergoes it, its amplitude, or power, changes. The speed at which this state change happens isn’t measured in miles per hour — instead, we measure it by finding out how often it happens in a given time. This is called “frequency.”
Everything in the universe, from an elemental atom to a star, has its own unique frequency. And the reason for this is the different number of protons, neutrons, and electrons that make up each elemental atom. But there’s more. When you take elemental atoms and make a molecule from them, that molecule now assumes its own unique frequency.
This happens every time you move one level up the scale of complexity. So the frequency of an elemental atom of oxygen is different from the frequency of the oxygen you can breathe (two atoms making up a molecule), and both are also different from the frequency of water (two elemental atoms of hydrogen bonded with one elemental atom of oxygen).
So frequency is a measurement of how fast energy moves through one single state change in a given time. This used to be called Cycles Per Second (CPS), but it’s now called Hertz (Hz).
But there’s another very important attribute of energy we haven’t looked at yet. Amplitude is a measure of how strong or powerful the energy is, and it changes throughout every state change. The change can be orderly or chaotic. Chaotic energy change is called “noise.” Here, we need only deal with orderly change, and we’ll do so in the next section.
Rife & Physics
Depending on what it’s being used for, Rife therapy works in a number of different ways.
Perhaps the most common use for frequencies is to kill pathogens, and the best description of how that process works that we’ve ever heard comes from John:
“Imagine a cowboy with a whip. He brings the whip back, then forward. When the sinusoidal energy wave traveling down the leather reaches the end, it must change direction very quickly. When it does, there is a loud ‘crack’ as the speed of the tip exceeds the speed of sound.
“It is only when the direction changes that the energy is expended. This is a close analogy to why only the peaks and troughs of a waveform create the output frequencies. These are the points in the wave where the voltage and fields change direction.
“Technically, it can be explained as conservation of momentum. Momentum is a vector that has direction. Momentum will not turn corners, so some of it is expelled as energy.”
This principle explains how “whiplash” injuries sustained in car crashes can be so physically devastating.
So now, here’s the unsuspecting pathogen, minding its own business, busy making your life miserable, and buzzing along at its own natural frequency.
Out of the blue, it now finds itself vibrating with much greater force because you’ve just transmitted its own natural frequency into your body by “cracking the Spooky2 whip” repeatedly. Adding two identical frequencies to each other greatly increases the energy in the target system, just as two ocean waves become bigger and more powerful when they conjoin as one.
But your overlaying waveform now controls how those conjoined energies behave. If you’ve chosen a wave with abrupt direction changes in energy, the rapid and repeated “whip-cracks” will cause electrical state changes that can damage, disable, or devitalize the pathogen.
Some frequency sets are specifically designed to disable specific life-systems, cell-wall components, or functions, so that a pathogen can no longer reproduce, take in sustenance, or even move. So it will quickly die.
For detox, the repeated application of energies serves to “bump” pollutants out of cells and tissues to where they can enter the blood or lymph and be removed by the liver and kidneys. The frequencies work pretty much like a jackhammer, and the result is the dislodgment and mechanical movement of materials foreign to the body.
For healing, the process is completely different and works on the principle of frequency entrainment. Take two grandfather clocks and stand them against the same wall. Now set their pendulums swinging out of sync with each other. Within a few days, both pendulums will have come back into perfect sync with each other, and will remain that way until they’re disturbed again.
That’s entrainment.
Another example is a little more mysterious and is seen only in girls’ boarding schools and university dorms. At the start of the term, the girls’ natural cycles are all out of sync with each other. Within a few months, they will all have synchronized to within a couple of days of each other.
That’s also entrainment.
So if you take the frequencies of a healthy liver, or a robust immune system, and you transmit them into a body where these are not so wonderful, within a few days frequency entrainment will have taken place, and things will start looking much better.
Some experienced Rife researchers also maintain that since life itself is frequency, the simple act of transmitting beneficial frequencies into the body — any beneficial frequencies — will act to “wake up” the immune system, “remind” it of its function, and set it to work again properly.
This concludes the extracted text from Part 22 of the Spooky2 User’s Guide. If you need further assistance or more text extracted, please let me know.
The Golden Rule of Rifing
Any living thing that lives in or on you, that consumes your energy or resources, and that confers no benefit upon you in exchange, is a parasite. This includes insects, fungi, bacteria, and viruses.
It may surprise you to learn that, with the possible exception of viruses, all parasites themselves have parasites. Viruses and spirochetes can parasitize bacteria. Fungi can parasitize larger fungi. They can also host viruses, bacteria, and insects. And insects can harbor many different parasites internally and on the surface of their bodies.
When you kill large parasites (“large” by comparison with bacteria), you are leaving all their internal and external parasites alive. When the large parasite decomposes, all those living fungi, bacteria, and viruses are released into your bloodstream.
And now you’re in big trouble. Since you’ve just killed their hosts of choice, you will have to take their place. You’ve just given your already-overburdened immune system a few million extra headaches to deal with.
So the rule when rifing is this:
Work from smallest to largest.
This can also be stated as:
Work from the inside to the outside, from the things contained to the container itself.
If you proceed like this you won’t end up in awful trouble, because when you finally get to kill your biggest parasites, you will already have killed everything they might have been carrying.
NanoGuide C: Troubleshooting
If you don’t have a PC you can rely on, then you don’t have a Spooky2 rig you can rely on either. Although it’s not always possible, it’s best to dedicate a computer to Spooky2 if you can, and use another one for social and internet activities. That’s what some users have chosen to do, and despite running very large rigs non-stop over almost three years, they’ve never had a problem.
If you’re technologically challenged, it may be a good idea to take a few evening classes on PC basics at your local library or community center so that you know how to navigate through the Windows file system and perform elementary tasks. Or get hold of a copy of “Windows for Dummies”!
If your PC is not so well-behaved, it’s possible that a number of things may happen when you launch the software:
Runtime Error 8002: Invalid Port Number:
This is a Windows error and normally indicates that the PC is confused about exactly what’s connected to its USB ports. It’s usually resolved by restarting the PC.
Remedies for Driver Problems:
Sometimes, an incorrectly configured PC or other software already installed can interfere with driver installation calls. You can fix this by installing drivers manually. Here’s how:
- Click the Utils menu on the menu bar and choose Install Spooky2–XM Drivers command if you have the Spooky2-XM generator, or for Spooky2 GeneratorX choose Install GeneratorX Drivers.
- The installer should launch and take you through the installation process. When it’s done, quit everything and restart your PC and Spooky2. You should now see your red physical Generator Button(s), plus the VG Button. If the driver installer doesn’t launch, or if it does launch but nothing has changed and you don’t see your Generator Button(s), it’s time to take a look under the hood:
(Note that the operating system shown here is Windows 7, but this information is broadly applicable to all versions.)
Click on the Windows Start Menu at the bottom left corner of your screen. Click into the Search Box and type:
device
You’ll get a list of results. The one you need is Device Manager (highlighted in the screenshot on the left).
Click on it to open Device Manager.
The window shown in the next screenshot will open.
But first, an explanation: there are two kinds of accounts on Windows — Administrator and User. If you log in using an account with admin rights and permissions, you can pretty much do anything you like on the PC. However, it’s not a good idea to go online using an Admin account because hackers can put this power to use if they get past your firewall. The answer is a User Account. This has less power to change anything, so it’s safer for online use. However, it can cause problems with certain kinds of software installations.
Thankfully, there’s a way round this without having to log out and back in as Administrator. First, quit Spooky2. Then click on the Windows Start Menu and choose Computer. The Start Menu will disappear and a new window will open.
The highlighted icon shown here is your (C:) drive.
The window now displays a list of all the folders on your hard drive. The Spooky2 folder is highlighted. Double click it.
Now you can see everything that’s contained in the Spooky2 folder.
This folder is where you’ll have to visit if you wish to manually install a new custom database, or edit your existing one in Notepad.
The top ten icons are folders, the rest are files (folders always contain files). The third folder in the list on the left—CP210x_VCP_Windows — contains XM driver installers.
Double click this folder to open it.
If your PC is a recent 64-bit model, choose the installer whose name ends with “x64.”
If it’s an older 32-bit machine, choose the “x86” installer.
In either case, right click on the file and choose “Run as administrator” from the context menu that pops up.
This will temporarily give you the permissions to install software into the deeper levels of the operating system.
When the installation finishes, it’s best to restart your PC because some flavors of Windows require this to correctly register newly installed components.
If, after all this, Spooky2 still can’t find your generator, it’s possible that your installation is damaged. In this case, it’s best to uninstall, then run a fresh copy of the installer again. Here’s how:
Right-click on the Windows Start Menu at the lower left of the screen and choose Control Panel as shown below.
The Start Menu will disappear and a new window will open.
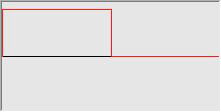
If you haven’t been here before, this is probably what you’ll see — not terribly informative or useful. So click on the View by menu at the top right and change it from Category to Small icons. And this is what you’ll see instead:
Here, we’ve highlighted the XM’s Silicon Labs driver. You can also see the Spooky2 entry further up the list. To uninstall, either double click the name, or select, then click Uninstall at the top of the list.
This concludes the extracted text from Part 23 of the Spooky2 User’s Guide. If you need further assistance or more text extracted, please let me know.
Uninstall the driver package, but don’t bother trying to uninstall Spooky2 — Windows isn’t very effective at removing anything that doesn’t have a registry entry. So it’s quicker and easier to manually delete it. To do this, simply navigate to the Spooky2 folder as you did before:
Windows Start Menu > Computer > Hard Drive (double click). Then drag the Spooky2 folder to the Recycle Bin and empty it.
Now you can download a fresh copy of the installer and try again. To do this new installation, we advise disconnecting from the internet, logging into an Administrator account on your PC, and installing Spooky2 for all users. Then restart the PC and log into your normal User Account so you can re-enable internet access if you wish.
Finally, click the System tab, then enter the number of generators you’ve connected into the Generator Count field near the top, and Spooky2 will find your entire rig a lot quicker on subsequent launches.
Generators Missing:
If you have four generators connected, but only three red Generator buttons, it means that either the driver hasn’t installed properly for the particular port your missing generator is connected to, or your COM port may have become a phantom port, or the generator’s USB cable may be faulty.
To fix the first, quit Spooky2, disconnect each generator’s USB cable from the PC/hub, and restart the PC. One by one, reconnect the generators and watch the right side of the Taskbar for alerts that tell you whether the driver install for that port was successful. With luck, they should all be. If not, it’s time to try swapping the USB cable for that missing generator so that Windows can identify it and install the correct driver. To address your COM port becoming a phantom port, try the Device Cleanup Tool described here.
Installing a Beta/EXE
The latest stable version of Spooky2 can always be found on the Spooky2 website’s Downloads page. This is the one that most people will wish to use. But John White sometimes provides advance beta versions of the next proposed official release for download on his own site, often as software-only EXE files. “Beta” means that they’re test versions, and so may contain bugs. And this is the main reason that they’re made available — so that experienced users can download and test them, then report any bugs found so they can be fixed for the next official release.
The length of time between official stable releases is generally two months, but three or four beta versions may be released for testing in the same period, and the final beta then becomes official and is uploaded to the Spooky2 website.
At that time also, if an update contains no changes to Spooky2’s support files, an EXE file download may also be provided for users with existing installations.
Because of the nature of beta software, no technical support can be provided since it’s essentially a work-in-progress. So unless you know your way around Spooky2 and your PC, it may not always be a good idea for you to install a beta, especially if you’re dealing with something serious. But if you wish to go ahead anyway, here’s how to do it:
Download the beta (or EXE) to your Desktop. The file name will always lack the word “_Setup” and end in “.exe.” This means that it’s an executable and doesn’t need to be decompressed like a .zip file or double-clicked like a full Setup installer. Click once on the file to select it, then press Ctrl C on your keyboard to copy it.
Navigate to the Spooky2 folder — Windows Start Menu > Computer > Hard Drive (double click).
Click anywhere on the list of files, then press Ctrl V on your keyboard to paste the beta into the folder. You don’t have to worry about the beta replacing your existing installation because its file name is different. However, you will need to make an easy way for yourself to launch the new beta.
To do this, you can either create a Shortcut, or you can “pin” the beta to the Taskbar or the Windows Start Menu. For a Shortcut, right-click on the beta file and select Create shortcut from the Context Menu that pops up. Then drag the newly created Shortcut out of the Spooky2 folder and onto your Desktop.
You can then close the Spooky2 folder window because double-clicking the Shortcut will now launch the new beta version. To pin the new version to the Taskbar or the Start Menu, you also right-click on the beta file, but this time choose either Pin to Taskbar, or Pin to Start Menu. Clicking on the beta’s icon in either of these two locations will then launch your new version. The following screenshot shows all the options:
The Context Menu pops up when you right-click on the new Spooky2 beta file. The Pin to Taskbar and Pin to Start Menu options appear close to the top of the menu. The Create shortcut option appears closer to the bottom.
Installing a Database
There are two different file formats for databases used in Spooky2 — ZIP and CSV. The ZIP format we use is encrypted, cannot be manually unzipped, and cannot be read by any software but Spooky2. This is to help prevent third-party profiteering on planned future frequency development, and the main database now comes in this format.
Please note once again that this can only be unzipped and read by Spooky2.
CSV files can also be read and loaded as custom databases, and these can be edited and used normally.
How to Install a Main Database (ZIP File)
‣ Either use a browser or the Download Database command in the Database Menu to download the database file, then quit Spooky2.
‣ Go to your Downloads folder and double-click on the Frequencies.s2d.zip archive to open it. Click on Frequencies.s2d, then press Ctrl C on your keyboard to copy it. You may not see the extension .s2d if your Folder Options in the Window File Explorer has extensions hidden.
‣ Now navigate to the Spooky2 folder — you know how to do this by now.
‣ You’ll see the older Frequencies.s2d file in the folder, and you have two choices — you can either: ✓ Drag the older file into the Recycle Bin, then click back into the Spooky2 window and press Ctrl V on the keyboard to paste the new file in. ✓ Leave the existing file where it is and just press Ctrl V. The existing Frequencies.s2d will be overwritten.
‣ Close the window and launch Spooky2. The new database will be loaded into memory and be available for immediate use.
How to Install a Custom Database (CSV File)
Click the Database menu on Spooky2’s menu bar and choose Select Custom Database #2. A Windows file navigation dialog will open. Navigate to the folder that contains your custom CSV file.
To load one into Spooky2, select it, then click the Open button to make it immediately available in Spooky2.
The Refresh Database command reloads the custom file after manual edits.
Hardware Notes
XM Auto Sync
When the Spooky2–XM generator was first launched back in January 2014, the Auto-Sync function triggered by the selection of Inverse and Sync or Spike+Sync wasn’t incorporated in the firmware because these features hadn’t yet been developed by John White.
This was rectified about a fortnight later. However, this means that the first batch of generators built must have their outputs manually synchronized.
We have now identified the range of serial numbers involved:
P/N24140001 – P/N24140181: these XMs have no Auto-Sync function.
P/N24140182 – P/N24140365: if the Revision No. is 2.85, Auto-Sync is built in. If not, the generator must be manually synced.
Depending on when you bought your generator, you may have an extra step to complete when you wish to use Inverse and Sync. Models sold from about two weeks after the range was launched will automatically synchronize both their outputs when you select Inverse and Sync or Spike+Sync in Spooky2. So if you bought yours after that time, you can skip this step.
If you were an early adopter, simply enter the following key sequence on the generator’s front panel:
CH2 – F5 – F5 – Sync – T.F.
Note: after you’ve finished your Inverse and Sync session, you can enter the exact same key sequence again to desynchronize the outputs and return the generator to normal use. Later models automatically desynchronize when you reselect Follow Out 1.
Preventing Communication Board Damage on Old Spooky2-XMs
Older Spooky2-XM generators had communication boards that were susceptible to burning out when the generator was not connected to its power adapter. A utility called Spooky2 USB Power Fix v1.01 that can remedy this issue is available here. This problem and using the utility to fix the issue is described here.
Thanks and Acknowledgements
The knowledge this User’s Guide contains comes from many sources, without whom it could never have been written. Inevitably, it will contain errors, which are ours alone, and omissions, which you can help fix.
Our thanks go to:
- Alvin Rose
- Argyrios Argyropoulos
- Blue Aquarian
- Bryan Yamamoto
- Chaffee Cline
- Chris Aguirre
- David Bourke
- David Halliday
- Echo Lee
- Ed Von
- Gwen Burley
- Hans Rikkerink
- Jason Elliott
- Jeff Kaczor
- Joe Strothman
- Johann & Tania Stegmann
- John White
- Judy Buduccio
- Karl Becker
- Kate Hu
- Kylin Zhang
- Manuel Mallo
- Marcello Allegretti
- Michelle Mullins
- Nick Dewey
- Paul Gruszka
- Robert Wolcott
- Roman Nowak
- Sebastien Mercier
- Sharyn Peacocke
- Suzi Smith
- Suzie Winter
- Syyenergy7
- Ting Ting Luo
- Trevor Nelson
- Walt Dod
- You
Precautions for Users
If you suffer from impaired liver or kidney functions, please exercise caution when using Spooky2. Frequency generation systems should NEVER be used while pregnant. Please do not operate the Spooky2 frequency generation system while driving or using dangerous machinery. Please keep your Spooky2 frequency generation system out of the reach of children. If you feel nauseous, faint, dizzy, or have ‘flu-like symptoms’ or headaches after exposures to Spooky2’s frequencies, please drink lots of pure water and shorten your future Spooky2 session times appropriately. Because no electricity is passed into the body when using the Spooky2 frequency generation system to broadcast frequencies via nonlocal space (Remote Mode), this system should have no ill effect on the electrical or mechanical components of cardiac pacemakers or internal defibrillators. But, as always when using frequencies, please proceed with care and caution. If you do suffer with heart problems, or wear a pacemaker or other electrical implant, you should NEVER attach electrodes to the Spooky2 system. Please use Spooky2’s Remote Mode ONLY.
NEVER attach TENS pad to the neck or the head for treatments or biofeedback scans. Instead, place the TENS pad on the shoulders or lower on the body. An unbalanced waveform used with Contact Mode can cause burning. A balanced waveform, when you look at its shape, the area above zero volts is equal to the area below zero volts. A normally balanced waveform is the default Square wave or Sine wave. You can make these balanced waveforms unbalanced by changing the offset to a nonzero value, or for Square wave changing the duty to a value other than 50. For an unbalanced waveform, you can help prevent burning by using the low powered Colloidal Silver port of Spooky Boost, and limiting the treatment time to 7 minutes with a 21-minute break between treatments. In general, it’s best to experiment with Spooky2 before about 5 pm because the excitation effects of frequencies on human cells can affect sleep. However, depending on the nature of your experimentation, Spooky2 can be run overnight if desired. Finally, when experimenting with Spooky2 or any other frequency generation system, proper hydration will produce better results. As a general rule, it’s best to drink 4-8 pints of pure water daily, half of it before noon.
On behalf of all the people who assisted in the development of Spooky2, we wish you all a long and healthy life.
The Spooky Team
Legal Notice & Disclaimer
Cancer Clinic NZ Ltd, Clean Technologies, John White, Echo Lee, supporting staff and crew (hereafter referred to as Team Spooky) ARE NOT RESPONSIBLE for any damage or injuries of any sort or form that may be sustained by any person or persons, any animal, or to any equipment or any other thing or things. The equipment, devices, and methods used by Team Spooky have not been inspected or approved by any governmental or medical agency or inspection service. No medical claims are made for, nor implied by Team Spooky.
You are advised to always consult with your physician or other health care professional at any time should you have or think you might have a health problem. Please check with your physician or other health care professional before starting any diet, exercise, taking over-the-counter (OTC) medications or supplements and especially before taking any prescribed medication. Never stop taking any prescribed medications without first consulting your physician. Please seek the advice of your doctor or healthcare professional before using Spooky or Spooky2.
This concludes the extracted text from Part 24 of the Spooky2 User’s Guide. If you need further assistance or more text extracted, please let me know.
Spooky2 Software License
Although the source code is © John White, this software is free, and has been written for the greater benefit and knowledge of all mankind. You are actively encouraged to pass it on freely to everyone you know, as long as it’s accompanied by this document.
This concludes the extracted text from Part 25 of the Spooky2 User’s Guide. If you need further assistance or more text extracted, please let me know.